How to Claim Tokens for Substrate Beneficiaries
This guide will walk you through the process of claiming your tokens if your Substrate address was included as a beneficiary.
The claiming process is feeless and is done by submitting an unsigned transaction to the tokenClaim with a valid signature.
Prerequisites
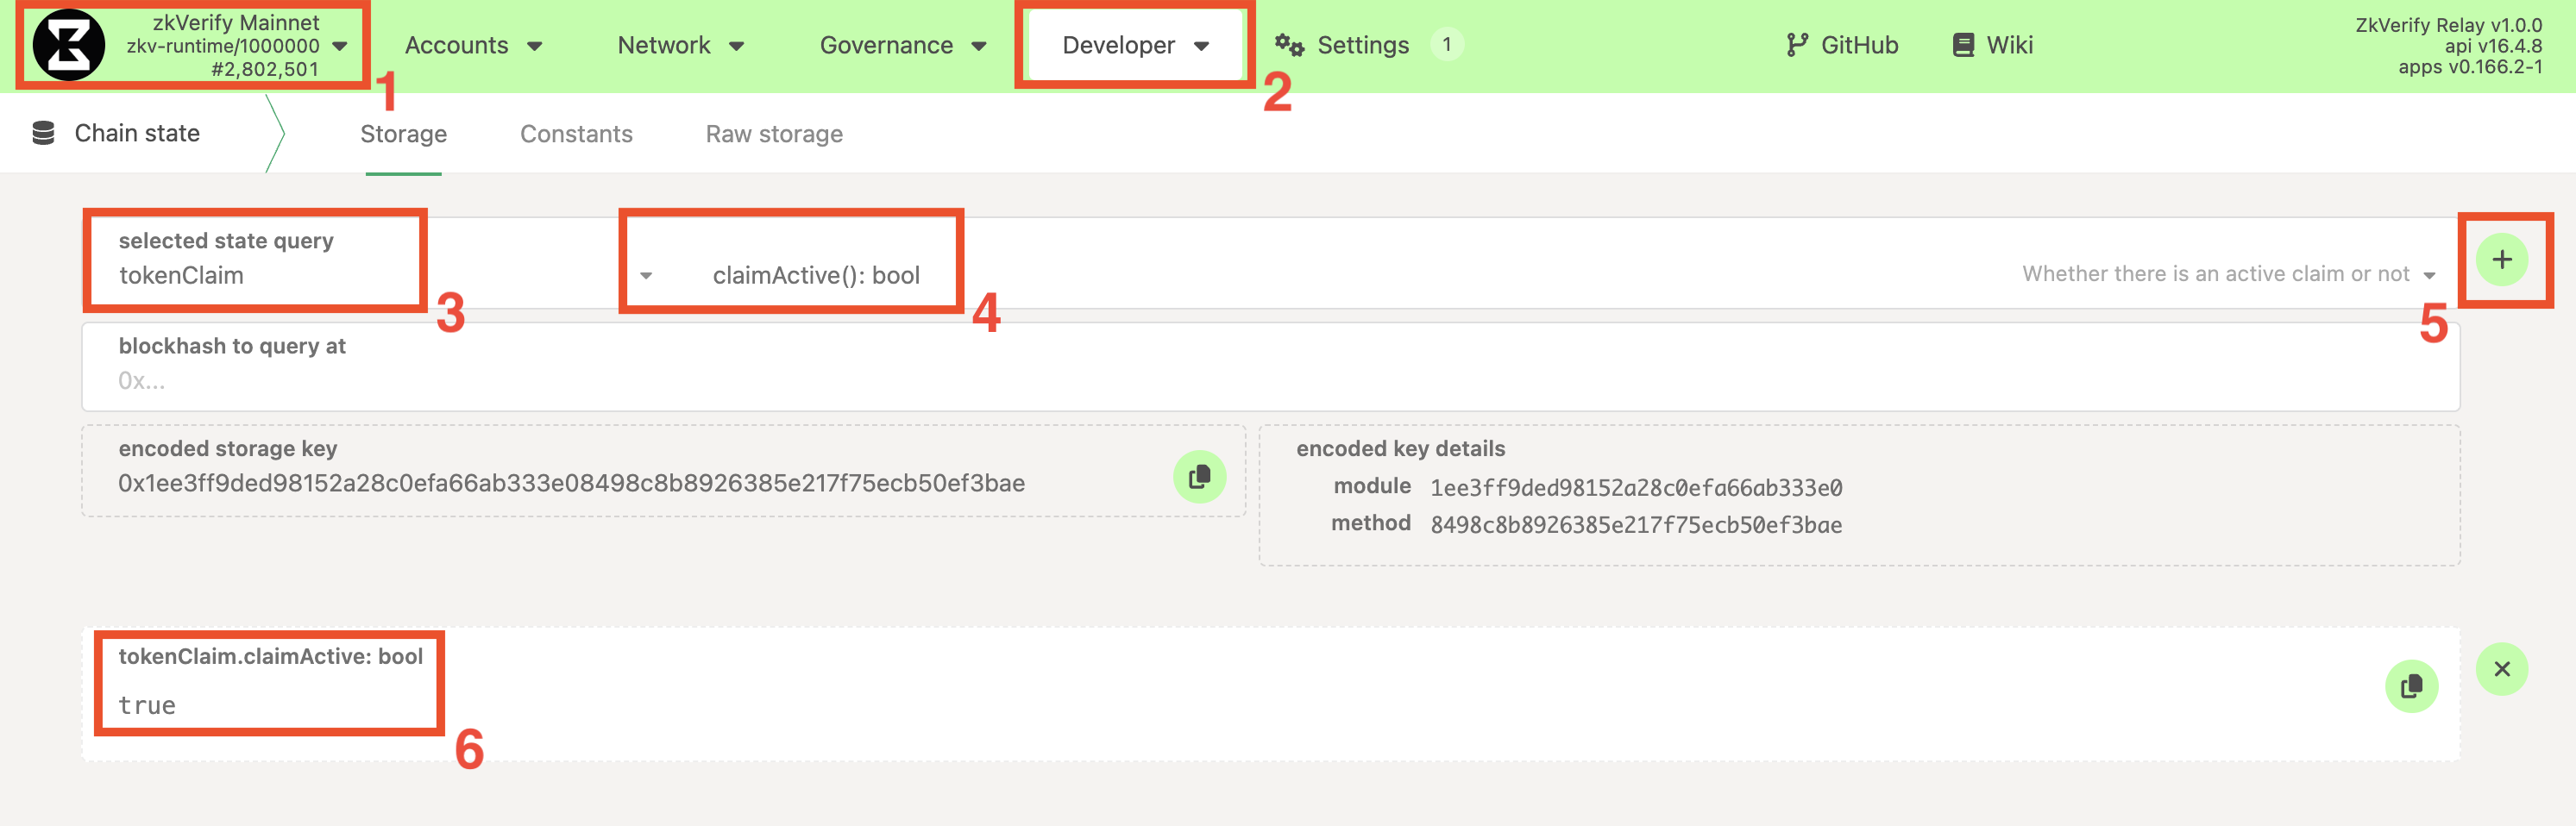
- Claim is active: The claim has been officially initiated. You can check this in the following way:
- Navigate to the PolkadotJS Apps interface for our chain.
- Navigate to Developer > Chain state tab.
- Select the
tokenClaimmodule and theclaimActive: boolmethod. - Click on the
+button on the right. If the claim has startedtruewill be returned,falseotherwise.
-
Access to Your Account: You have access to the Substrate account that is on the beneficiary list.
-
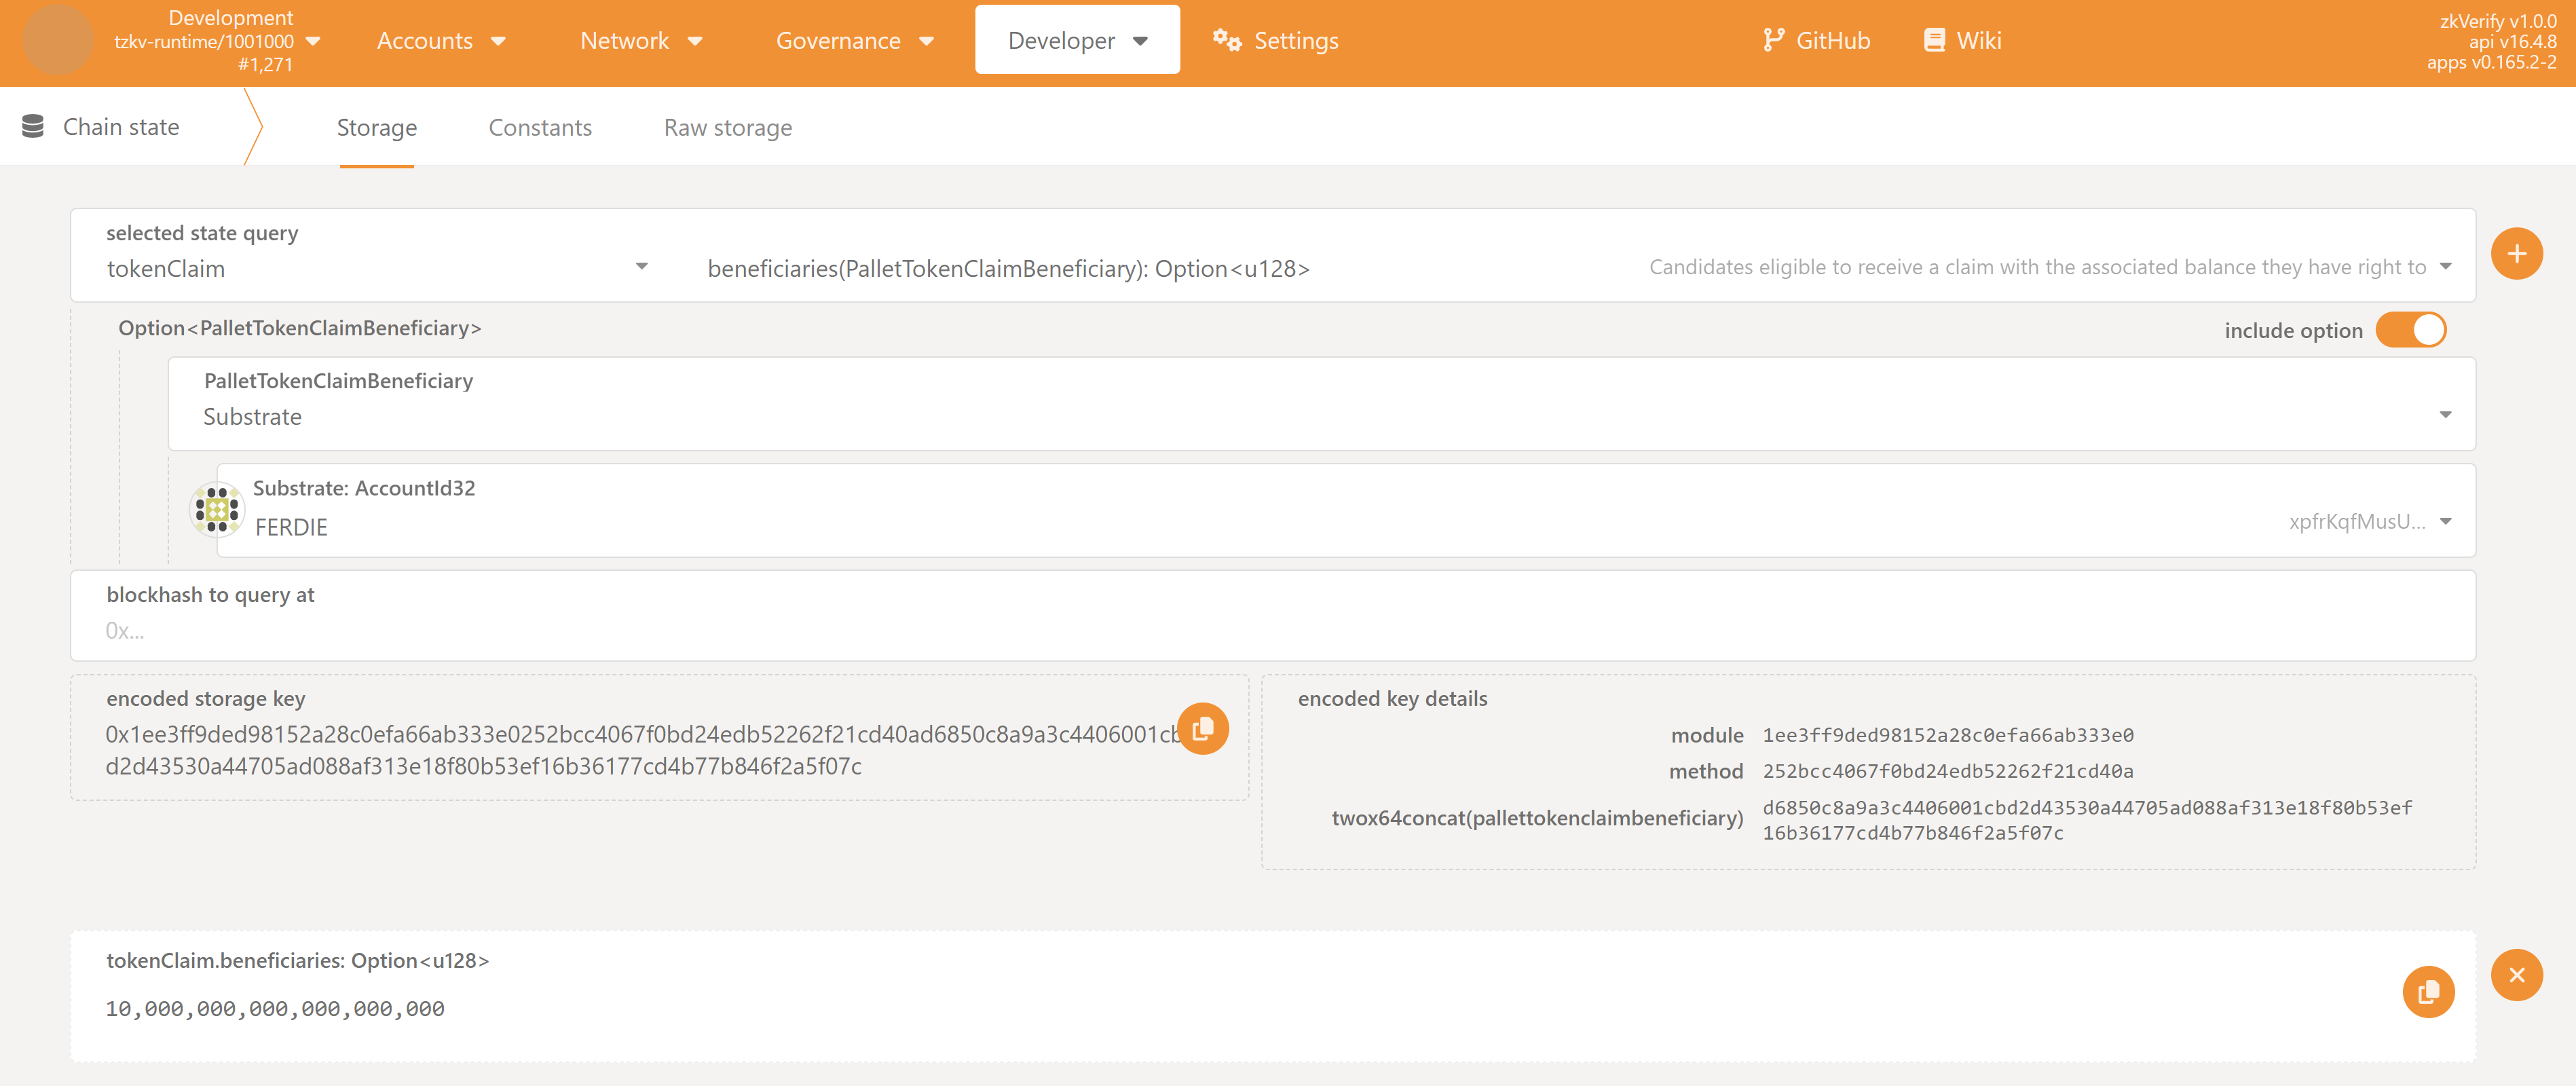
Eligibility: You have confirmed that your Substrate address is on the list of beneficiaries for the current giveaway. You can easily check if you are eligible in this way:
- Navigate to the PolkadotJS Apps interface for our chain.
- Navigate to Developer > Chain state tab.
- Select the
tokenClaimmodule and thebeneficiaries(PalletTokenClaimBeneficiary): Option<u128>method. Make sure also to check theinclude optionbutton on the right. - From the new fields that show up, set:
PalletTokenClaimBeneficiarytoSubstrateSubstrate: AccountId32to your Substrate address.- Leave the
blockhash to query atfield empty
- Click on the
+button on the right. If you are eligible, you should see returned the amount you are entitled to (with 18 decimals), otherwise<none>will be returned.
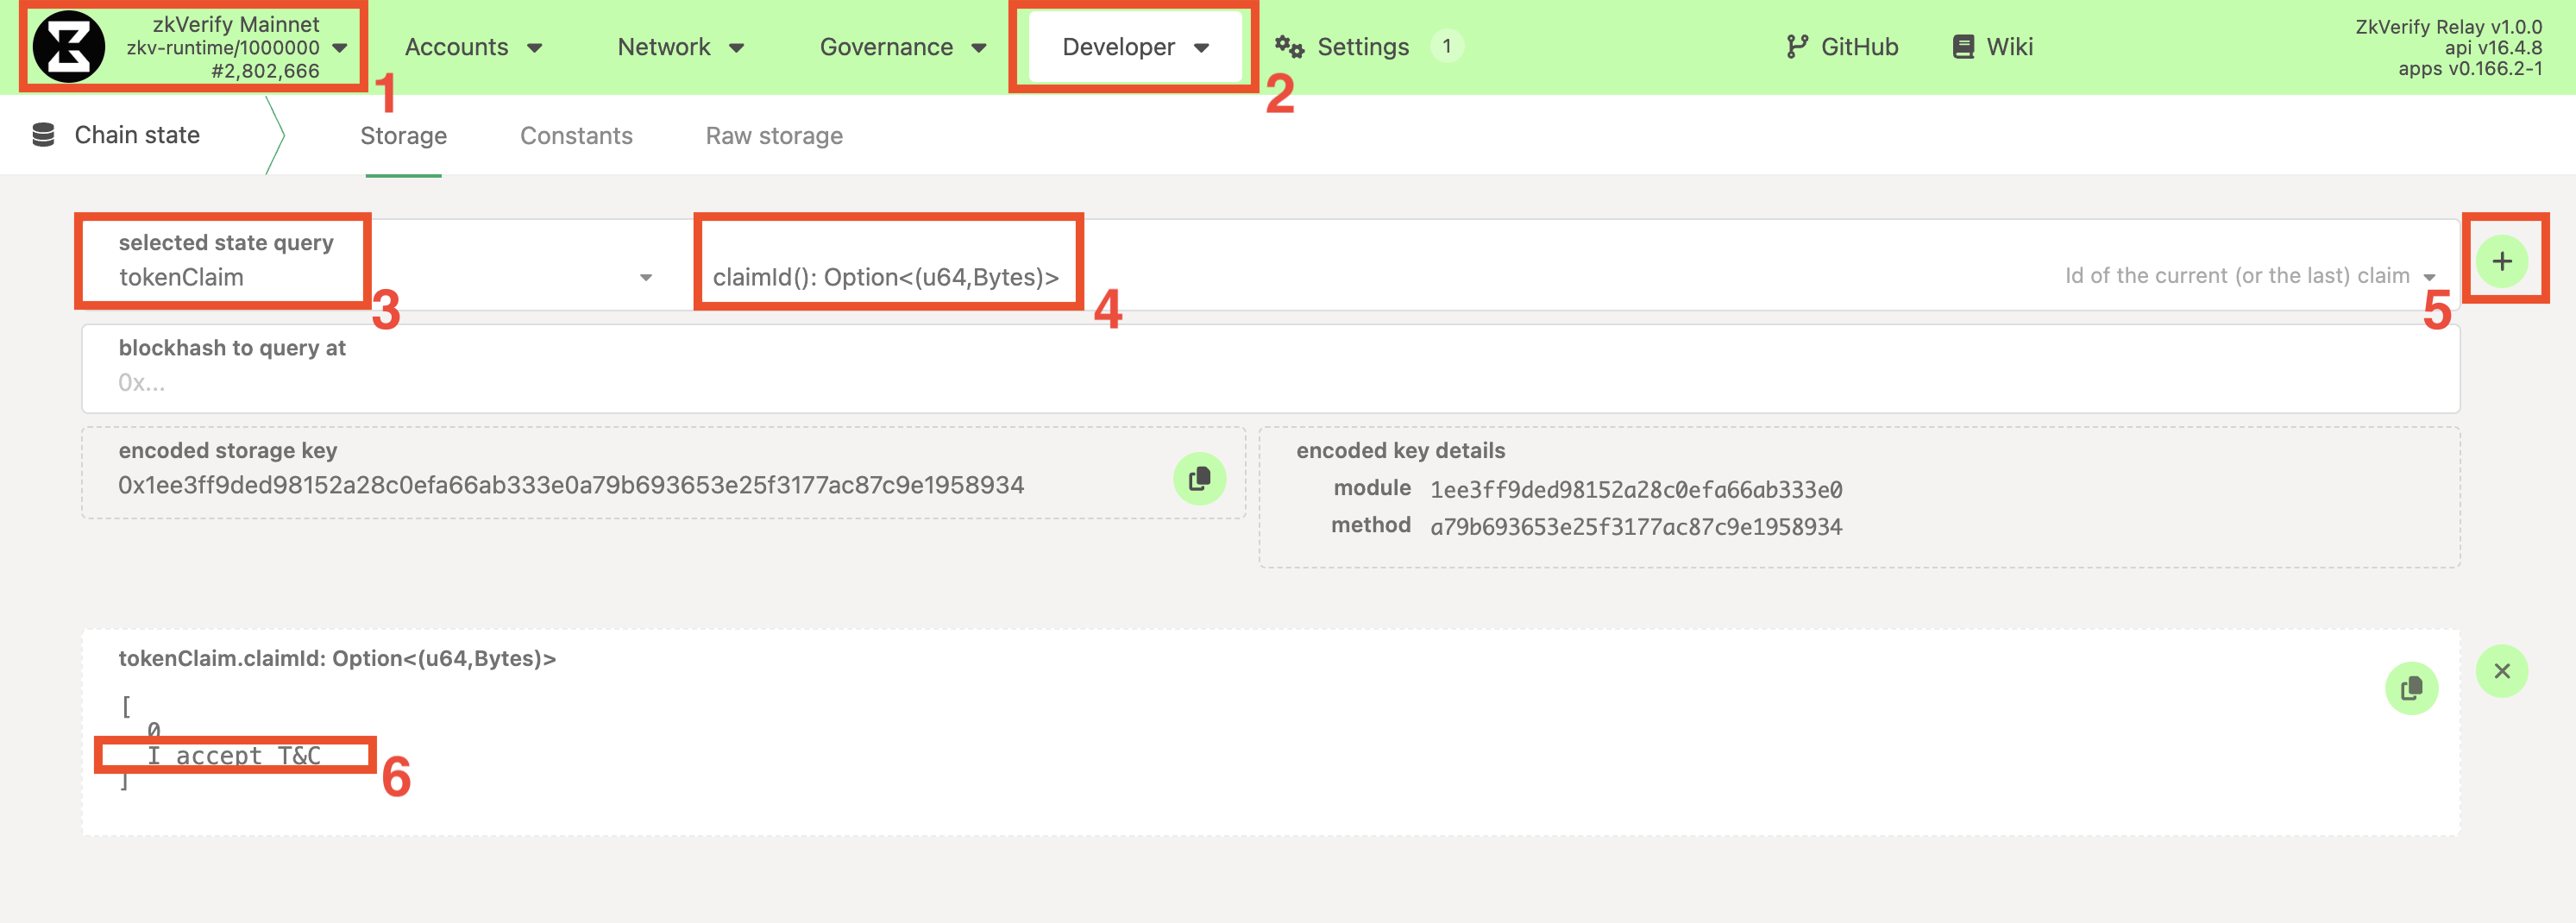
- Official Claiming Message: The project team will announce an official, unique "claiming message" when the giveaway period begins. You will need this exact string of text.
You can get is as well on-chain in the following way:
- Navigate to the PolkadotJS Apps interface for our chain.
- Navigate to Developer > Chain state tab.
- Select the
tokenClaimmodule and theclaimId: Option<(u64, Bytes)>method. - Click on the
+button on the right. A number and a string will be returned. The message to be signed for this claim is the string, and you might want to copy it.
Step 1: Generate Your Signature
For this tutorial, let's assume the message is:
claim_round_1
You need to sign the claiming message using your eligible Substrate account. This proves you own the address. You can do this in several ways, but we recommend using the PolkadotJS Apps interface.
- Recommended: PolkadotJS Apps UI
- Advanced: Subkey CLI
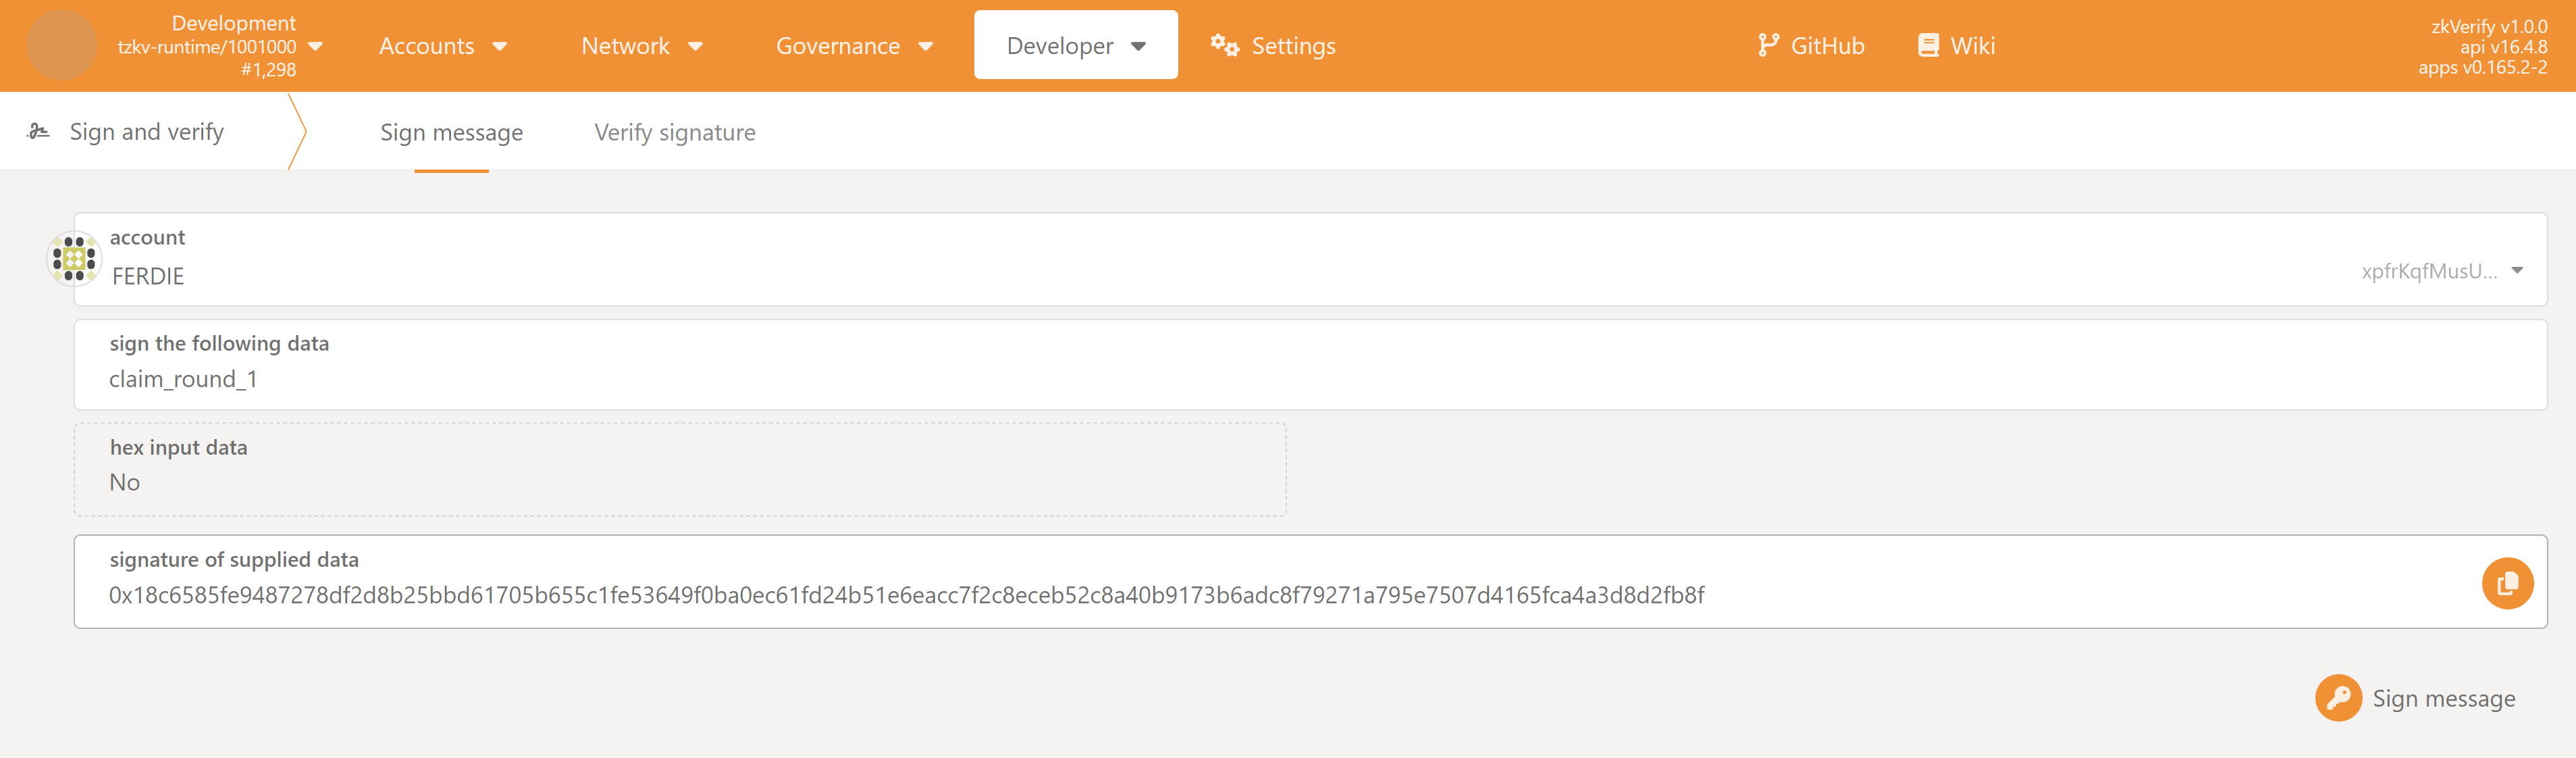
- Navigate to the PolkadotJS Apps interface for our chain.
- Go to the Developer > Sign and Verify page from the top menu.
- Select your account: In the
accountdropdown, choose the Substrate account that is on the beneficiary list. - Enter the message: In the
sign the following datafield, paste the exact official claiming message from Step 1. - Click the "Sign message" button.
- A popup from your wallet will ask you to confirm the signature.
- After signing, a signature string will appear in the field
signature of supplied data. It will be a long string starting with0x.... - Click the copy icon to copy the entire signature to your clipboard.
If you are an advanced user comfortable with the command line, you can use the subkey tool.
This method involves using your mnemonic phrase (seed phrase). Never expose your seed phrase in an insecure environment.
Open your terminal and run the following command, replacing the placeholder values:
subkey sign --message "claim_round_1" --suri "your twelve or twenty four word seed phrase" --scheme "sr25519/ed25519/ecdsa"
The output will be the signature hash (e.g., 0x...). Copy this value.
Step 2: Submit the Claim Transaction
Now that you have the signature, you will submit it to the chain using an unsigned transaction.
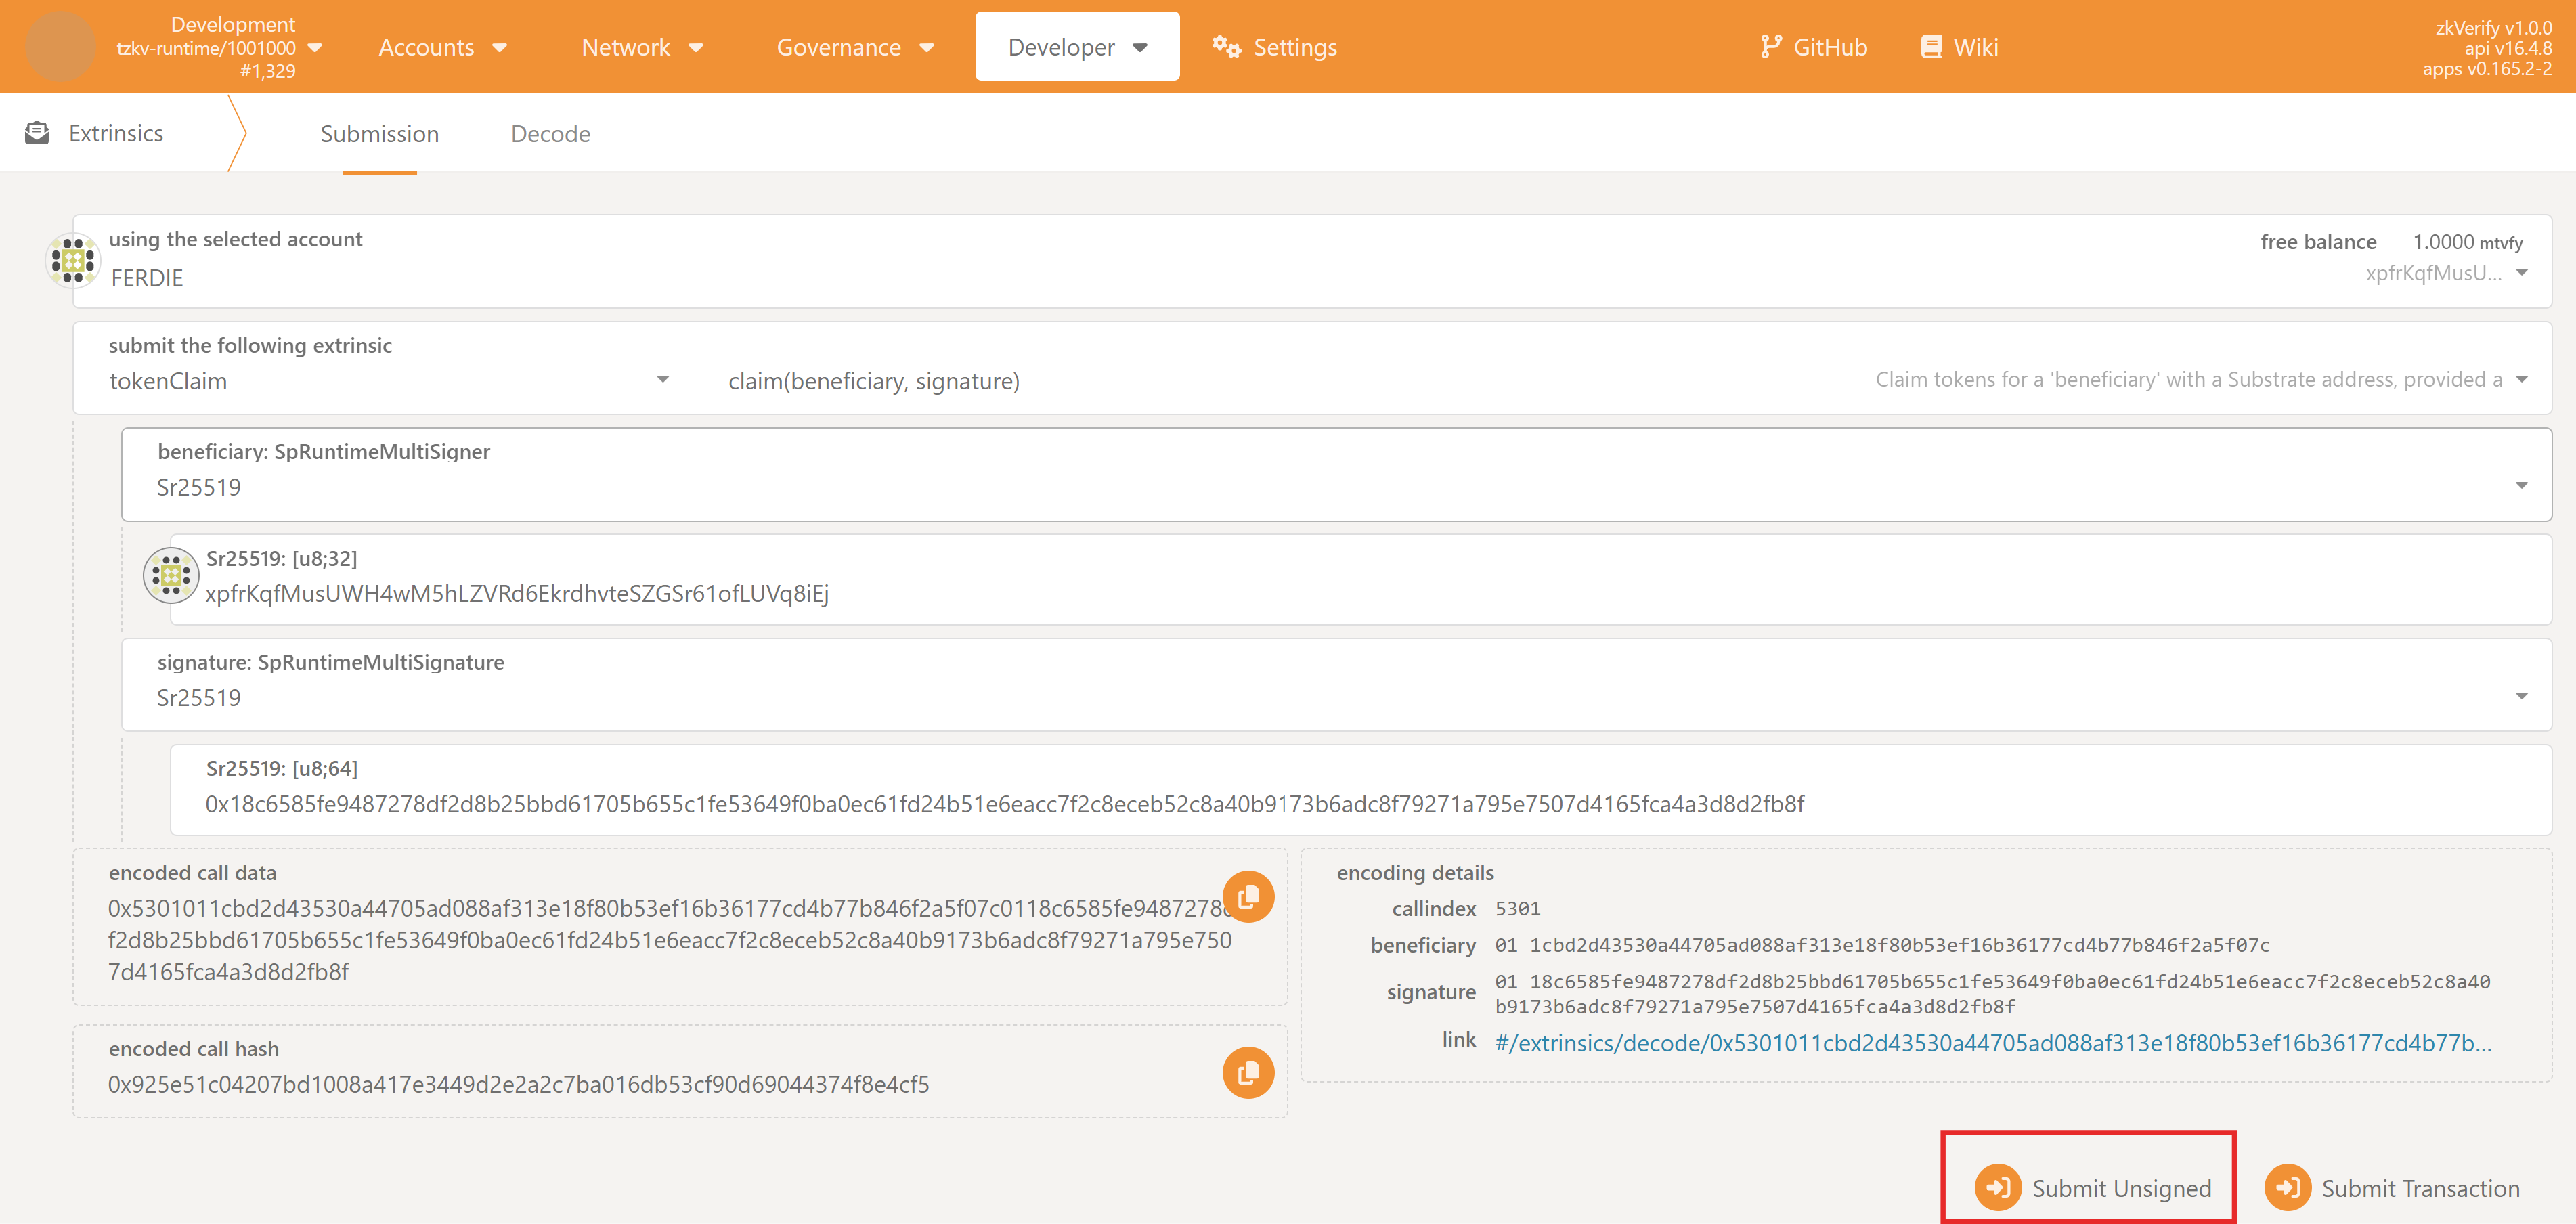
- On the PolkadotJS Apps interface, navigate to Developer > Extrinsics.
- Select the
tokenClaimmodule from the first dropdown and theclaim(beneficiary, signature)method in the second dropdown.
Considering that we're going to submit an unsigned transaction, it doesn't really matter which account you choose in using the selected account
to submit the transaction itself
Now, depending on your account type:
- Typical Flow (sr25519 scheme)
- Advanced (ed25519 scheme)
- Advanced (ecdsa scheme)
If you have created a simple account with one of the supported wallets (e.g. Talisman, Subwallet, etc.), these are the steps you have to follow:
- For the
beneficiary: SpRuntimeMultiSignerfield, selectSr25519, and in the fieldSr25519: [u8;32]insert your address (e.g.ZKY..,xpi..) - For the
signature: SpRuntimeMultiSignaturefield, selectSr25519, and in the fieldSr25519: [u8;64]paste the signature you copied in Step 1.
If you have created an ed25519-based account, these are the steps you have to follow:
- For the
beneficiary: SpRuntimeMultiSignerfield, selectEd25519, and in the fieldEd25519: [u8;32]insert your address (e.g.ZKY..,xpi..) - For the
signature: SpRuntimeMultiSignaturefield, selectEd25519, and in the fieldEd25519: [u8;64]paste the signature you copied in Step 1.
If you have created an ecdsa-based account, these are the steps you have to follow:
- For the
beneficiary: SpRuntimeMultiSignerfield, selectEcdsa, and in the fieldEcdsa: [u8;33]insert your hex compressed public key (e.g.0x3..). You can obtain the public key leveraging thesubkeytool:
Copy the value ofsubkey inspect "<Your seed Phrase>" --scheme ecdsaPublic key(hex)from the output. - For the
signature: SpRuntimeMultiSignaturefield, selectEcdsa, and in the fieldEcdsa: [u8;65]paste the signature you generated in Step 1. Please note that the PolkadotJSSign & Verifytool is able to generate ECDSA signatures if your account is of type ECDSA. We recommend to useSubkeyto generate the signature though
- Click the "Submit Unsigned" button and the Submit (no signature) button in the new window that will appear.
For advanced users: if you don't plan to use the PolkadotJS Apps interface for claiming your tokens, be aware of the fact that the beneficiary: SpRuntimeMultiSigner
requires, in reality, a hex public key. The React frontend, for sr25519 and ed25519 types, is automatically able to convert from your address to the underlying public key,
while this is not true for ecdsa scheme.
This means that, when invoking the extrinsic, you need to pass your hex public key, that you can obtain via subkey or the Convert address utility from PolkadotJS Apps interface.
Step 3: Verify Your Claim
If the signature and account are valid, the transaction will be processed, and a green checkmark ExtrinsicSuccess will appear at the top of your screen.
You can verify the claim was successful by checking your account balance on the Accounts page, or by verifying that your address is not present anymore in the beneficiaries list.
Troubleshooting
If the transaction fails, you will see a red sign on top of your screen and an InvalidTransaction error message if you hover over it. The possible errors are:
Transaction is outdated: There is no active claim at the time the transaction was submitted.Invalid signing address: The Substrate address you are trying to claim for is not on the beneficiary list.Transaction has a bad signature: The signature on the message is not verified. Either the signature is malformed (e.g. the wrong message was signed) or the signature has not been produced by the expected claimant address.