Teleport Token across zkVerify Parachains
XCM Teleport
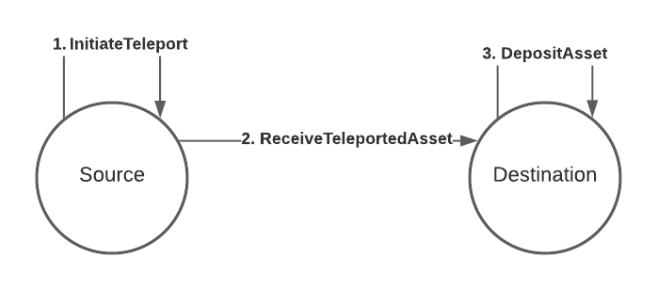
A teleport is a powerful Cross-Consensus Message (XCM) instruction that facilitates the movement of assets between zkVerify Relay Chain and its System Parachains.
A teleport of an asset (VFY token) is an operation performed in two stages by an XCM executor: one part is executed on the Relay chain (burns the asset) and the other part on the Parachain (minting of the asset).
In this guide, we will be using teleport to move VFY tokens from zkVerify to VFlow and viceversa.
You can find more information on XCM here.
From zkVerify to VFlow via PolkadotJS-UI
From PolkadotJS navigate to Developer-> Extrinsics and select the xcmPallet pallet and the teleportAssets extrinsic:

You can see that we need to supply 4 parameters: dest, beneficiary, assets and feeAssetItem. Let's start with the dest parameter:
Destination
This parameter specifies the target chain where the assets are being teleported. Let's select:
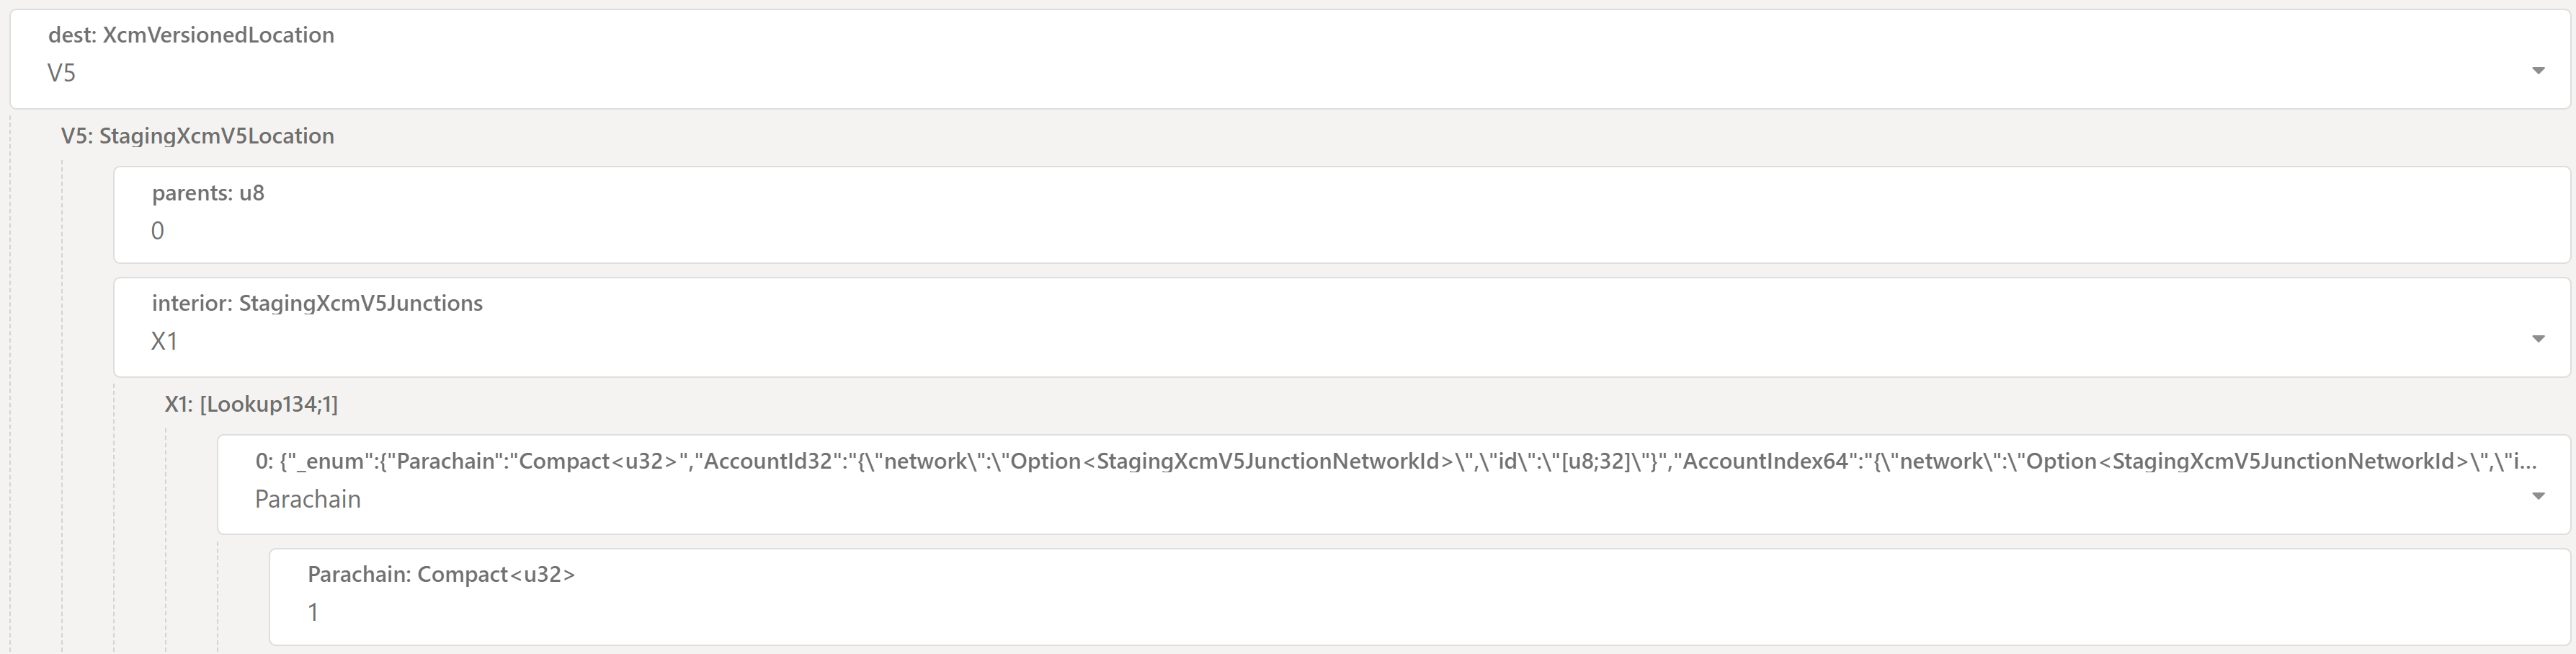
v5asdest: XcmVersionedLocationfrom the scroll-down menu. New fields will pop-up. Let's set:parentsas0interiorasX1from the scroll-down menu. Then new fields will appear. Let's set:Parachainas0field, from the scroll-down menu- We need finally to insert the ID of the VFlow
Parachain, which is1.
Let's provide a brief explanation here:
destprovides details about the destination of the message (we need to select the XCM version currently being used. V5 is the most-up-to-date at the time of writing).-
parentstells the Relay Chain XCM executor that the followinginterioris relative to the Relay chain itself. -
interiordescribes the rest of the path, the specific, step-by-step directions to the final destination. It defines a sequence of "hops" or Junctions. Each junction is a specific location or entity within a consensus system.- The interior is structured as a container, usually X1, X2, X3, etc. where X stands for the number of Junctions (hops) in the path.
- Here: Equivalent to X0, no junctions.
- X1: A path with one junction.
- X2: A path with two junctions.
- ...and so on, up to X8.
- The interior is structured as a container, usually X1, X2, X3, etc. where X stands for the number of Junctions (hops) in the path.
-
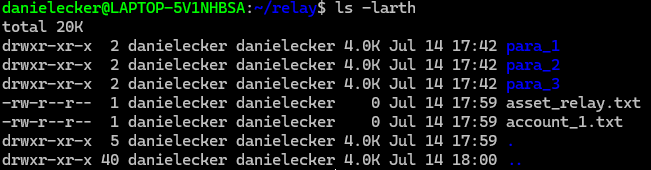
You could think of it like a File System where:
- The root directory is the Relay Chain
- There are as many sub-directories as Parachains.
- In each directory there is a list of consensus entities (accounts, pallets, etc.) living in that Relay Chain/Parachain.
So setting parents = 0 means it's the current location (in bash it would be .) while parents = 1 means it's the parent location (in bash it would be ..).
Setting interior = X1 { Parachain: 3 } means essentially specifying ./parachain_3;
Instead setting interior = X2 { Parachain: 3, AccountKey20: 0x111 } means essentially specifying ./parachain_3/account_111
Putting it all together, we are initiating the teleport from the Relay Chain (so parents is 0, since we are already on the Relay Chain) to the Parachain with id 1, which is one hop away from the parent (so interior is X1 with Parachain set to 1).
Beneficiary
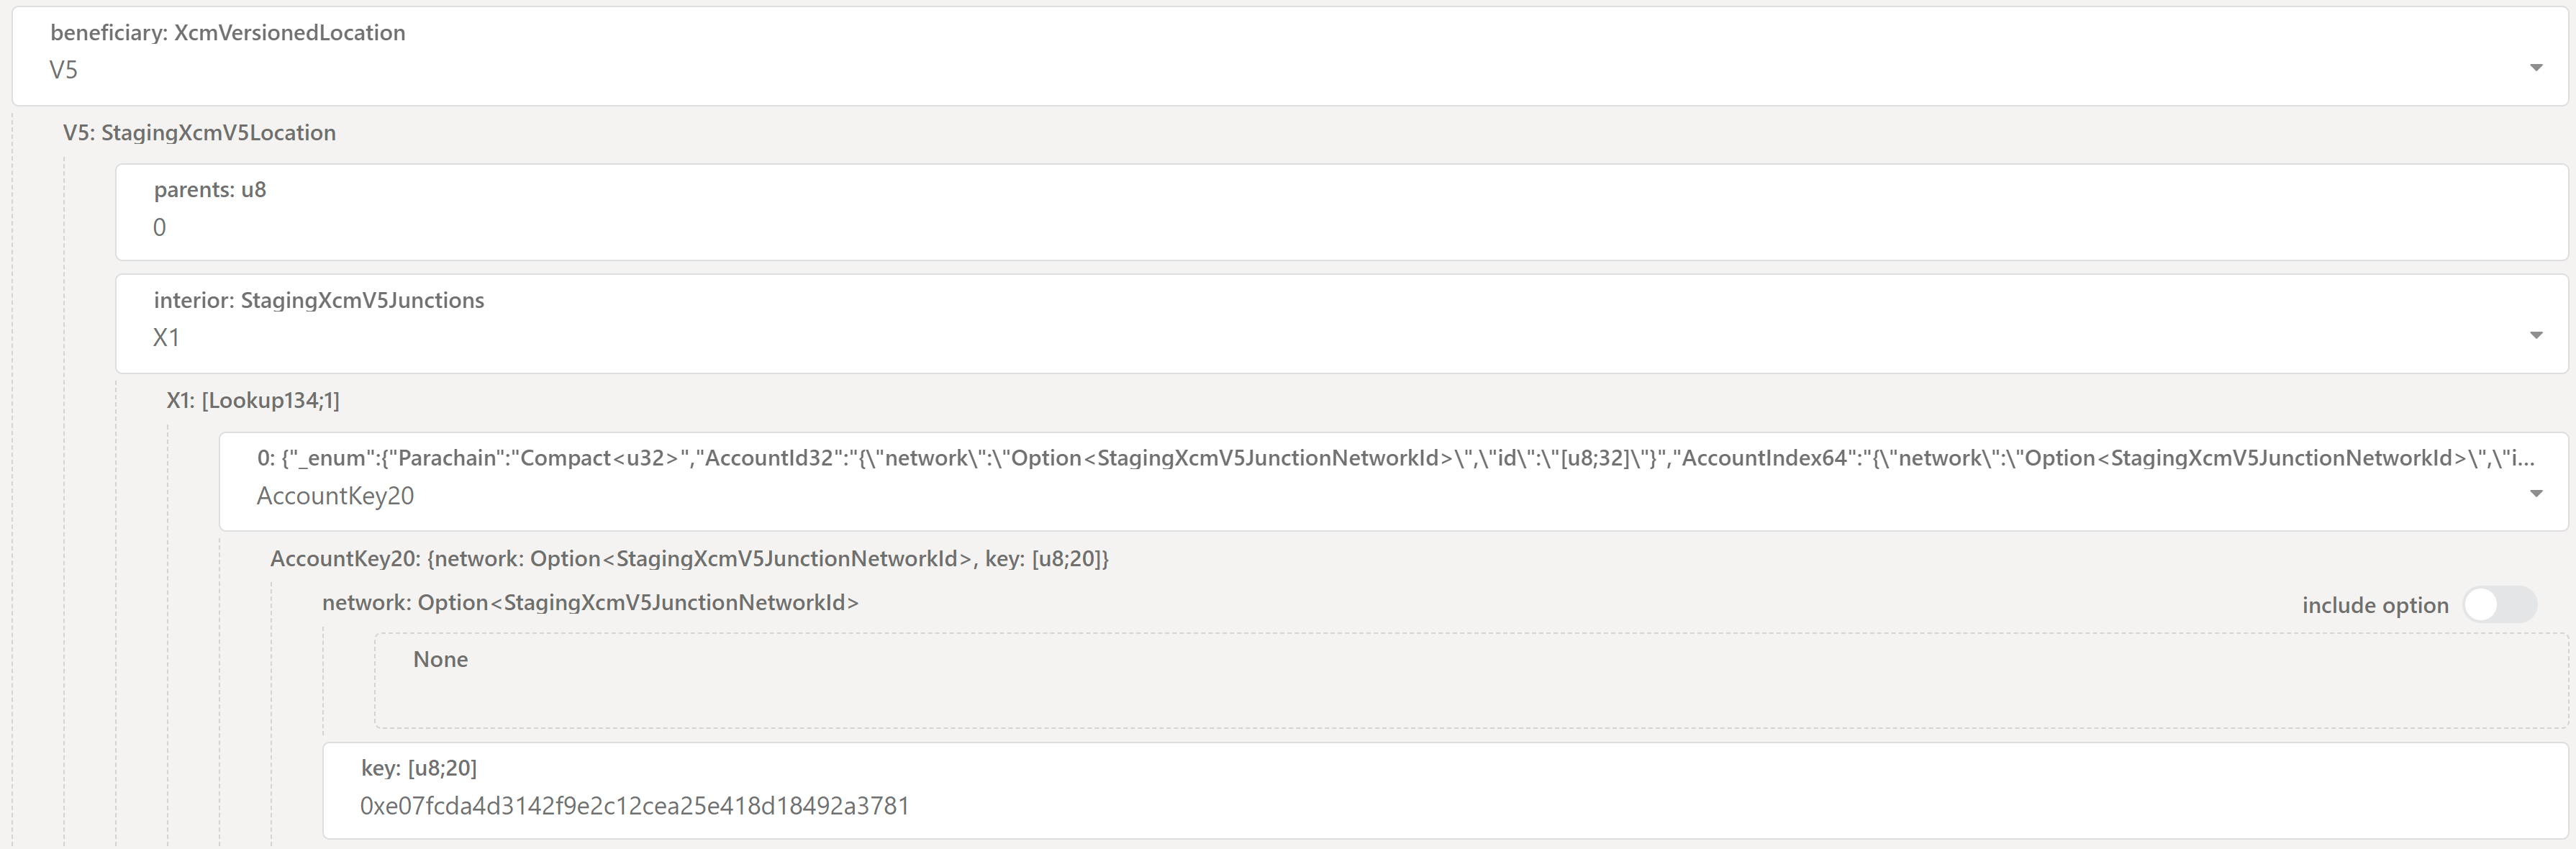
This specifies the account that will receive the assets on the destination chain. Let's set:
v5asbeneficiary: XcmVersionedMultiLocationfrom the scroll-down menu. New fields will pop-up. Let's set:parentsas0interiorasX1from the scroll-down menu. Then new fields will appear. Let's set:AccountKey20as0field, from the scroll-down menu- We need finally to insert the address of the Ethereum account we want to receive the assets on VFlow.
Note the usage of:
parents = 0: the instruction for minting the funds and depositing them into the beneficiary's account is executed by VFlow. From VFlow perspective, the beneficiary account is right there on-chain. It doesn't need to go up to the Relay Chain to find it (we are already in theparachain_1directory)interior = X1: We need to do "one hop" from the Parachain to the beneficiary account on the Parachain itself (like accessing./beneficiary_account)
Assets
This defines the actual asset(s) and the amount(s) you are sending. Let's set:
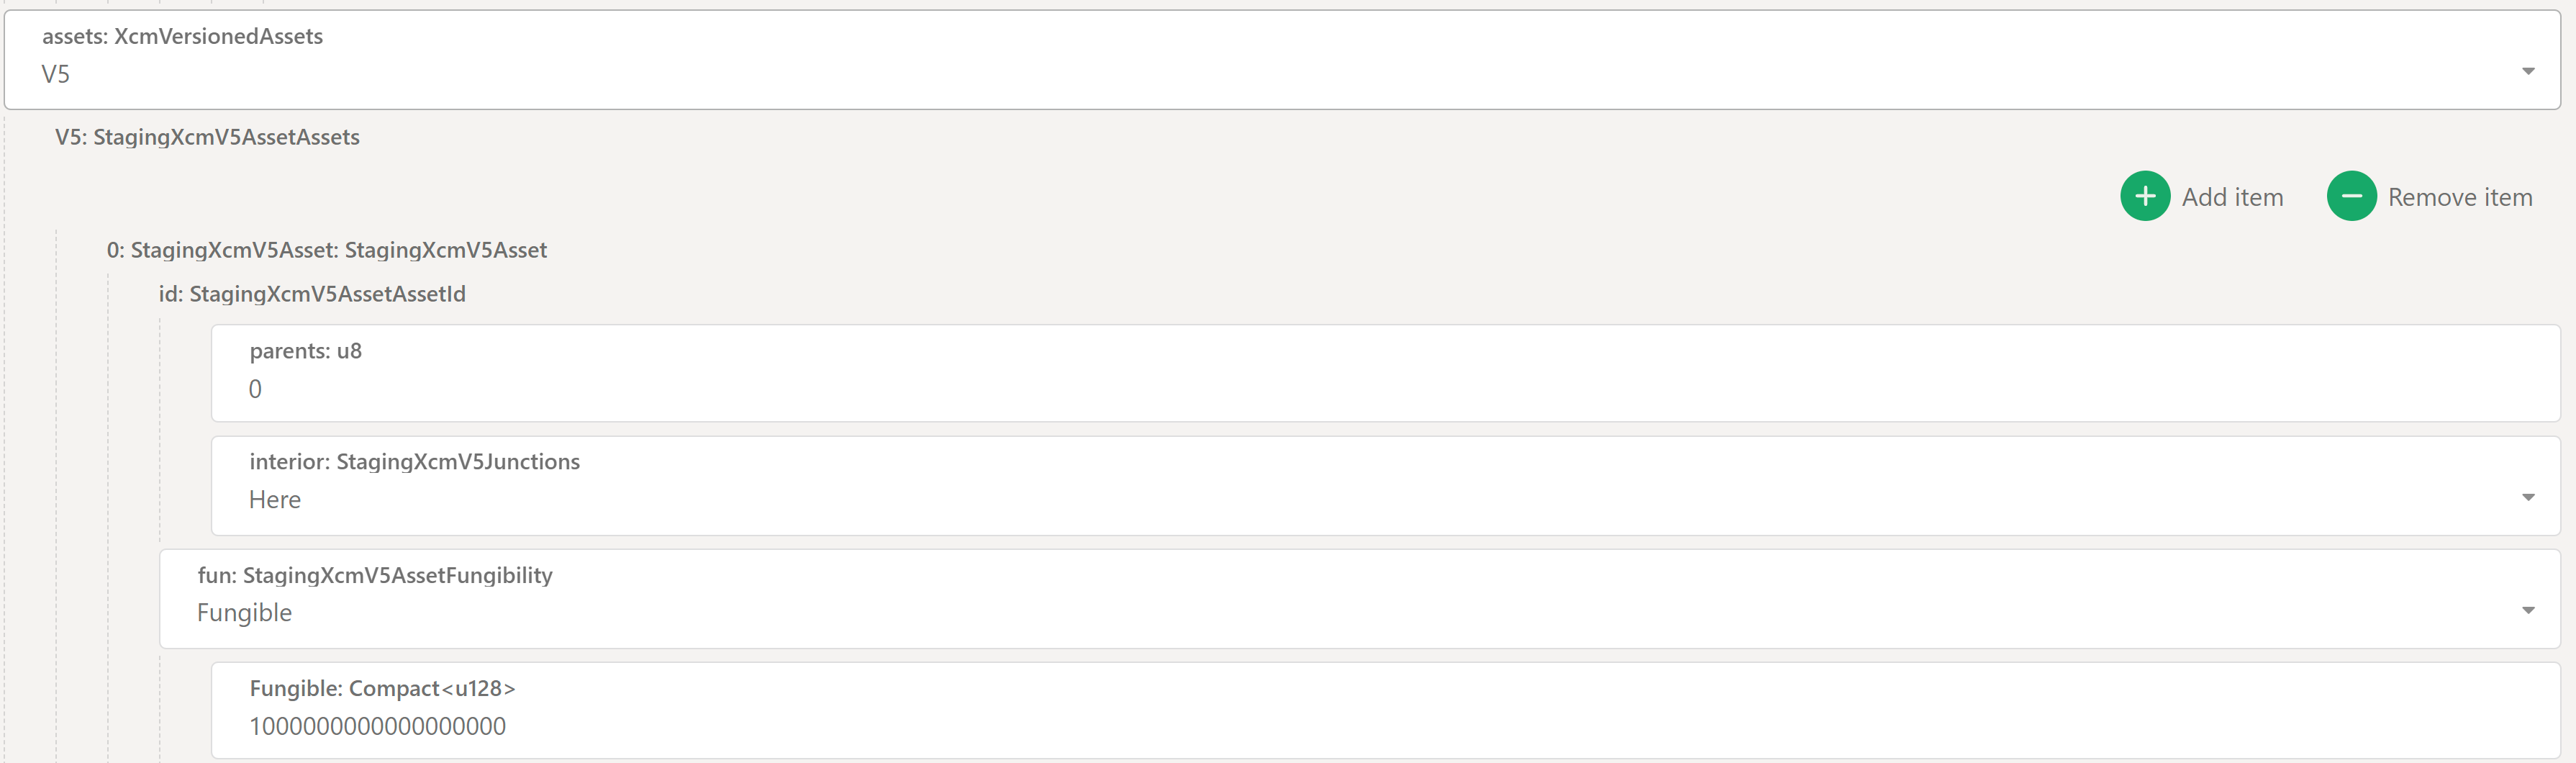
v5asassets: XcmVersionedMultiAssetfrom the scroll-down menu. Click on theAdd Itembutton. New fields will pop-up. Let's set:parentsas0interiorasHerefrom the scroll-down menu. Then new fields will appear. Let's set:Fungibleasfunfield, from the scroll-down menu- We need finally to insert the amount of assets we want to send in the
Fungiblefield. In this case we are sending 1 VFY so, remembering that the token has 18 decimals, this will be a 1 followed by 18 zeros:1000000000000000000.
Note the usage of parents = 0 and interior = Here: the asset VFY is native on the Relay Chain, from which we are building the XCM teleport and from which the XCM executor will burn funds.
Fee Asset Item
This is simply the index of the asset in the assets array that will be used to pay for the XCM teleport fee. We only have a single asset (VFY) and we are using that one, so we set it to 0.
Submitting the extrinsic
Finally, let's click on submitTransaction and then sign And Submit on the new window that will appear to conclude our teleport.
If you don't want to construct this complex extrinsic by yourself, you can go to Developer -> Extrinsics -> Decode and copy/paste the following hex:
0x69028400486b90dbf0cb9bfe92b6ba7d4942019a17ada772ab5fa9258ac3df821daca54d0186a4c5711073978f36dd5b6c42f421fcd5fe5d3fbbc89011380e62cfb2247729970ccae4d50757ca313d06e97c58fcc1aa6aedc380d55f024d3204aef76ec18ec5027c00008c0105000100040500010300b311b8f3eb086477244cb1e198c697ee0d699d9105040000001300004c31b8d9a79800000000
Then click on the Submission tab and change the values you need (like the Parachain ID, amount, destination address, etc.).
From VFlow to zkVerify via PolkadotJS-UI
The process here is exactly a mirror of what we did on zkVerify side.
From PolkadotJS navigate to Developer-> Extrinsics and select the zkvXcm pallet and the teleportAssets extrinsic.

Like before we need to supply 4 parameters: dest, beneficiary, assets and feeAssetItem.
Destination
Let's start with the dest parameter:

v5asdest: XcmVersionedLocationfrom the scroll-down menu. New fields will pop-up. Let's set:parentsas1interiorasHerefrom the scroll-down menu. Then new fields will appear. Let's set:
The destination is the Relay Chain so parents is 1 (we are in a Parachain, a sub-directory of the Relay Chain root directory, so we need to move one directory up), the interior is Here (once moving up, we are in the root directory, which is the Relay Chain directory, so we have already arrived in the correct location).
Beneficiary
Let's set the beneficiary parameter as follows:
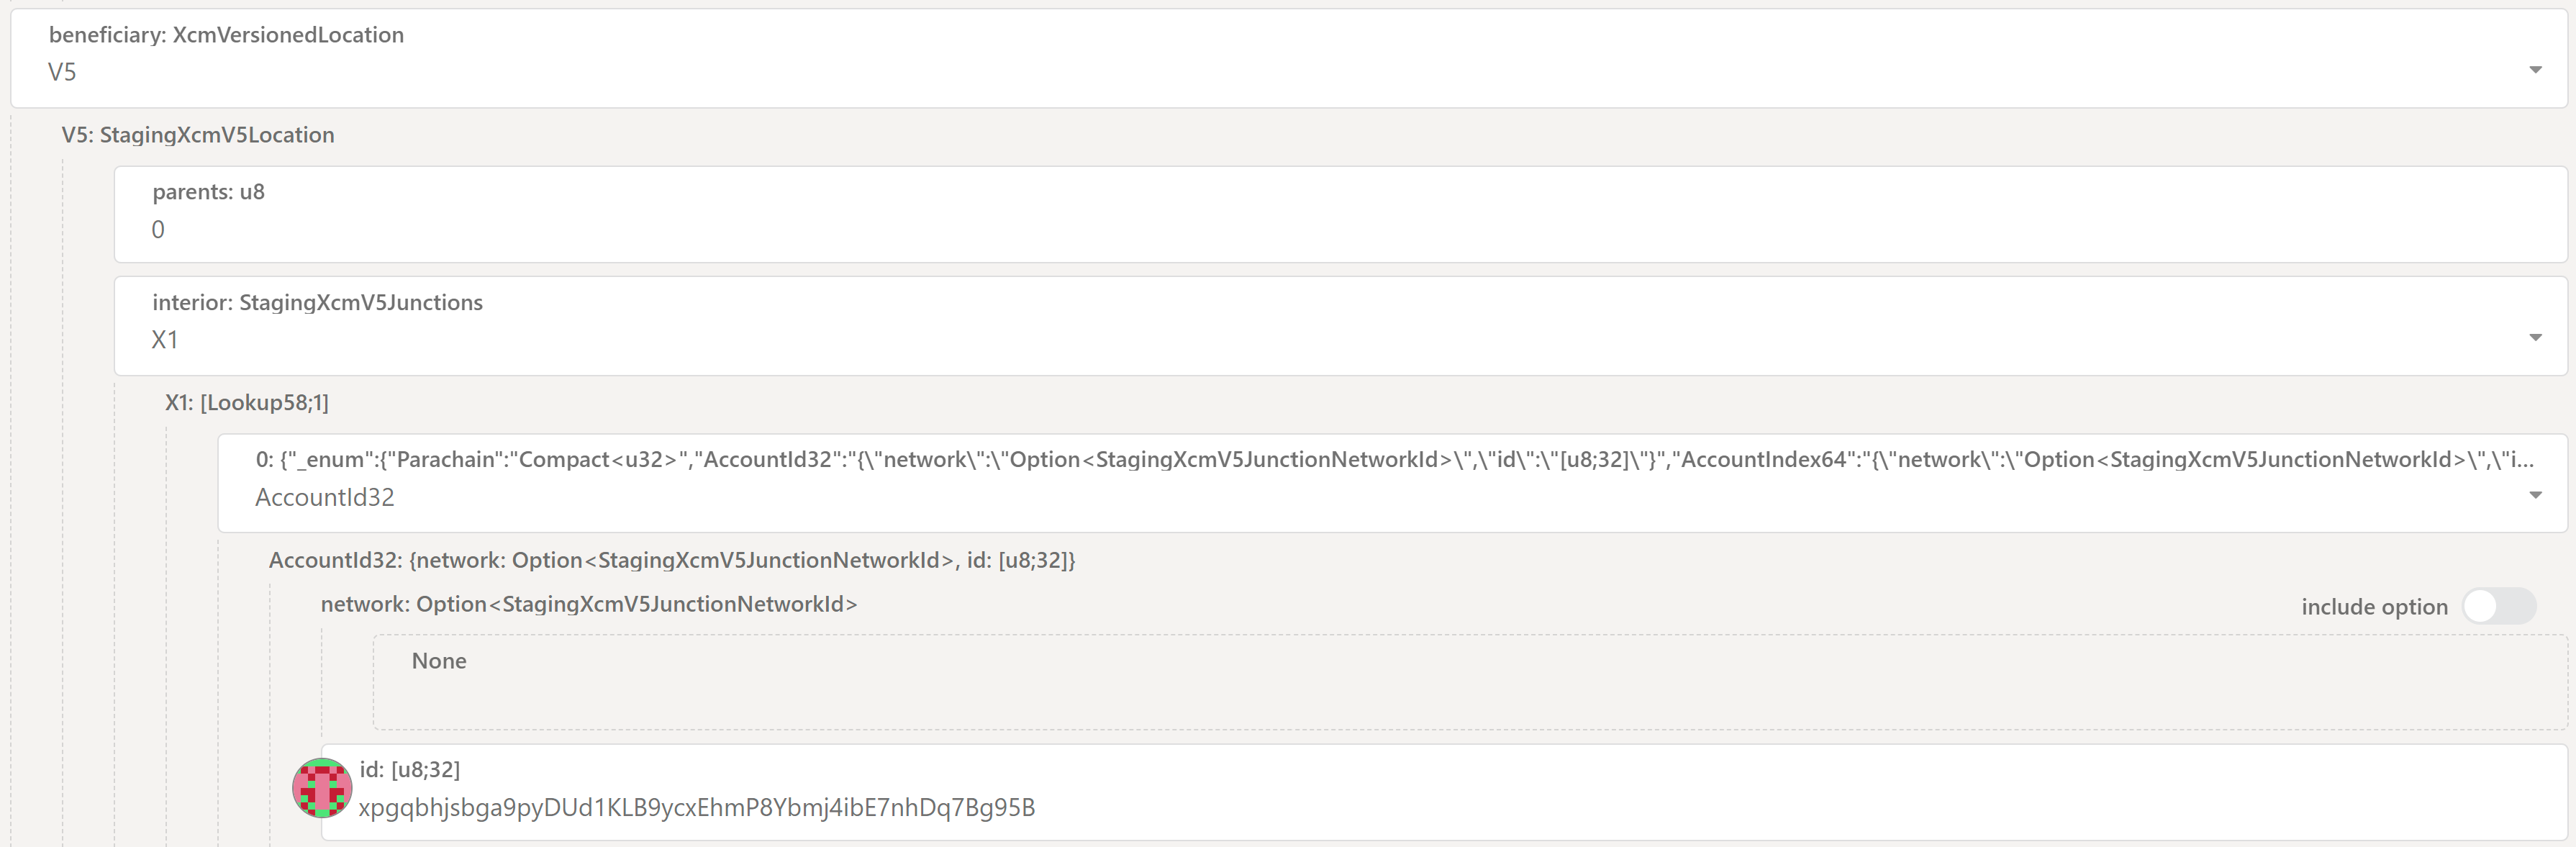
v5asbeneficiary: XcmVersionedMultiLocationfrom the scroll-down menu. New fields will pop-up. Let's set:parentsas0interiorasX1from the scroll-down menu. Then new fields will appear. Let's set:AccountId32as0field, from the scroll-down menu- We need finally to insert the address of the zkVerify account we want to receive the assets on zkVerify.
Note that:
- The instruction for minting the funds and depositing them into the beneficiary's account is always executed on the destination chain (in this case, the Relay Chain): as such,
parents = 0(from the point of view of zkVerify) interior = X1: We need to do "one hop" from the Relay Chain to the beneficiary account on the Relay Chain itself (like accessing./beneficiary_account)
Assets
Let's set the assets parameter as follows:
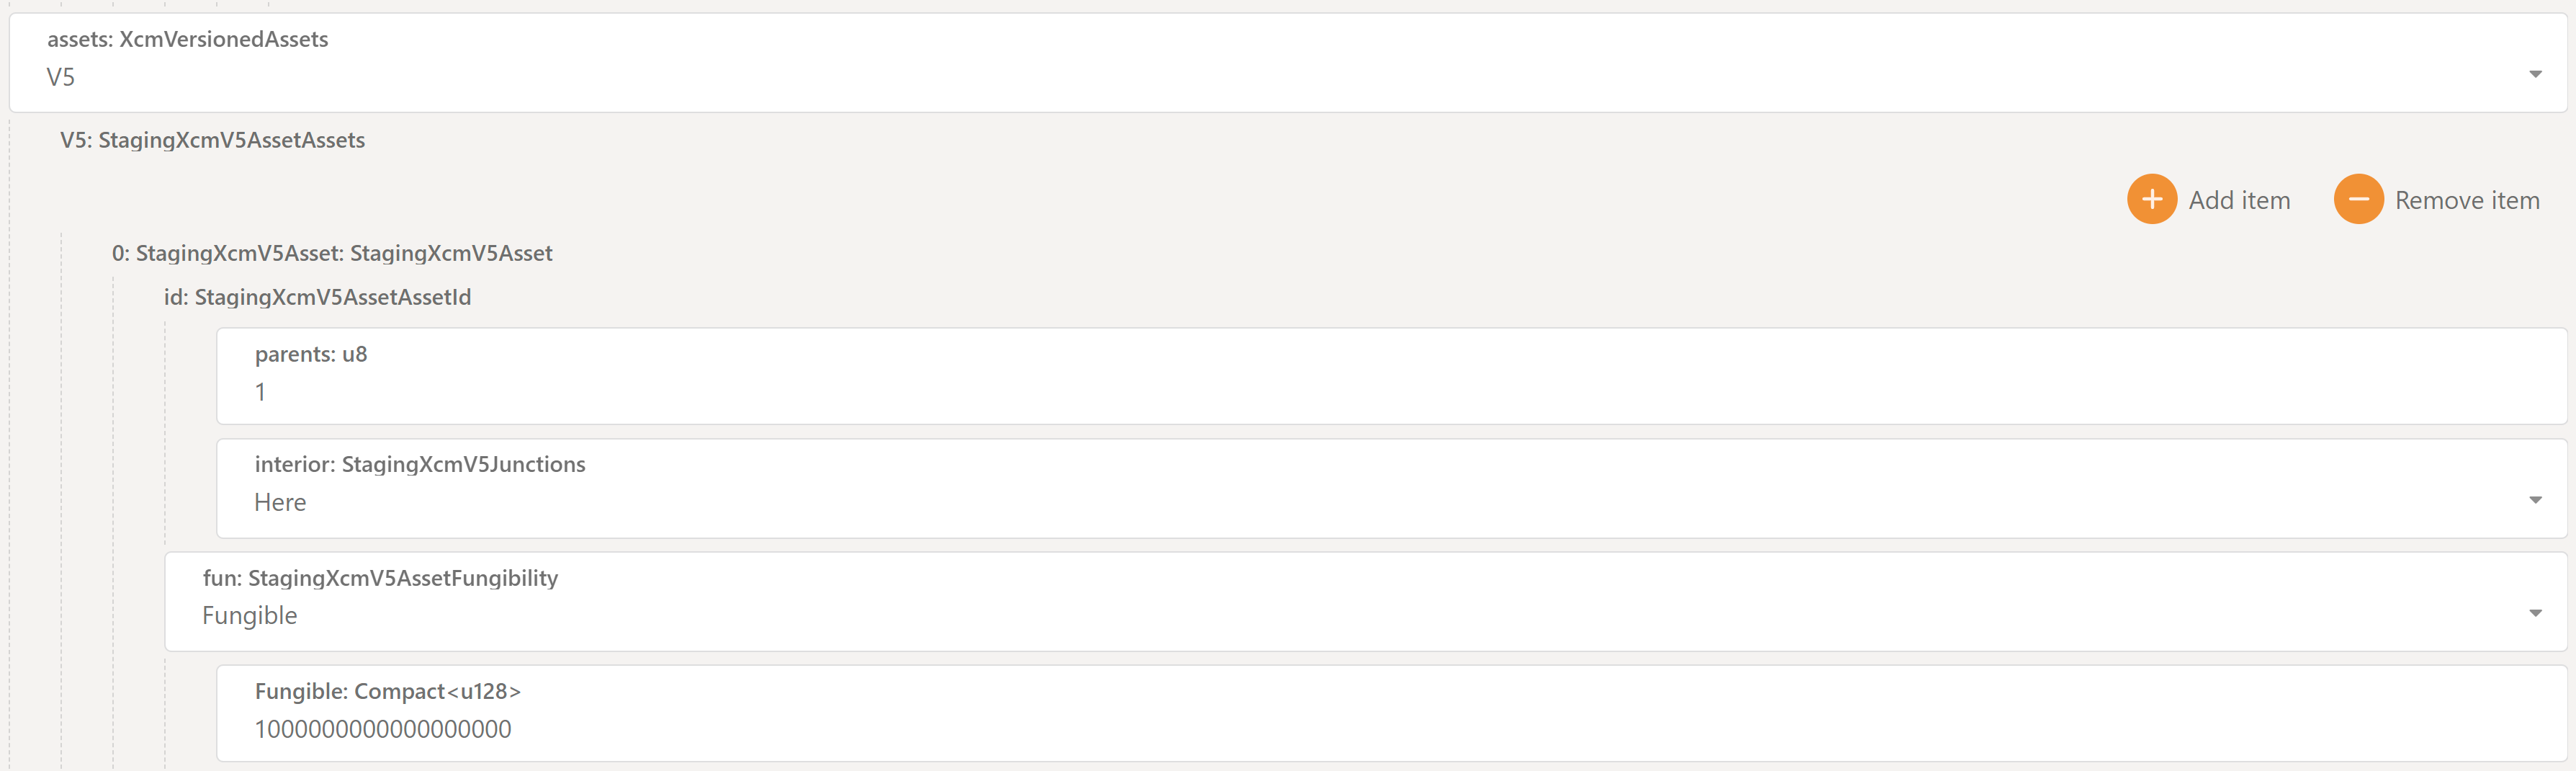
v5asassets: XcmVersionedMultiAssetfrom the scroll-down menu. Click on theAdd Itembutton. New fields will pop-up. Let's set:parentsas1interiorasHerefrom the scroll-down menu. Then new fields will appear. Let's set:Fungibleasfunfield, from the scroll-down menu- We need finally to insert the amount of assets we want to send in the
Fungiblefield. In this case we are sending 1 VFY so, remembering that the token has 18 decimals, this will be a 1 followed by 18 zeros:1000000000000000000.
Note that the parents is 1, as the VFY asset is native of the Relay Chain (so one directory up from the point of view of the Parachain).
Fee Asset Item
This is simply the index of the asset in the assets array that will be used to pay for the XCM teleport fee. We only have a single asset (VFY) and we are using that one, so we set it to 0.
Submitting the extrinsic
Finally, let's click on submitTransaction and then sign And Submit on the new window that will appear to conclude our teleport.
If you don't want to construct this complex extrinsic by yourself, you can go to Developer -> Extrinsics -> Decode and copy/paste the following hex:
0x5d0284e07fcda4d3142f9e2c12cea25e418d18492a3781db9a6d3e84d2331a3b02c371f782180d79c4ed54bebac862cdae663527e47b4405dde8273edde4ec218e4f2fd4300df9ca09ec35be66137cad5ad1c3fe16004b0025010800001f010501000500010100486b90dbf0cb9bfe92b6ba7d4942019a17ada772ab5fa9258ac3df821daca54d050401000013000064a7b3b6e00d00000000
Then click on the Submission tab and change the values you need (like the amount, destination address, etc.).
From VFlow to zkVerify via EVM Tooling
We've included a precompile contract in VFlow that allows you to teleport VFY tokens to zkVerify directly from your standard EVM tools (like Metamask).
Contract is deployed at address 2060. Here is an example script leveraging web3 library:
const { Web3 } = require('web3');

// Configuration
const RPC_URL = 'wss://vflow-rpc.zkverify.io'; // VFlow RPC endpoint
const PRIVATE_KEY = ''; // Your Ethereum account private key
const PRECOMPILE_ADDRESS = '0x000000000000000000000000000000000000080C'; // XCM Teleport precompile address

// XCM Teleport precompile ABI
const teleportABI = [
  {
    name: 'teleportToRelayChain',
    type: 'function',
    inputs: [
      { name: 'destinationAccount', type: 'bytes32' },
      { name: 'amount', type: 'uint256' },
    ],
    outputs: [],
    stateMutability: 'nonpayable',
  },
];

async function testTeleport() {
  // Initialize Web3
  const web3 = new Web3(RPC_URL);

  // Add your account to the wallet
  const account = web3.eth.accounts.privateKeyToAccount(PRIVATE_KEY);
  web3.eth.accounts.wallet.add(account);

  console.log(`Using account: ${account.address}`);

  // Check balance
  const balance = await web3.eth.getBalance(account.address);
  console.log(`Account balance: ${web3.utils.fromWei(balance, 'ether')} tVFY`);

  // Set up the contract
  const contract = new web3.eth.Contract(teleportABI, PRECOMPILE_ADDRESS);

  // Test parameters
  const destinationAccount = ''; // 32-byte relay chain account
  const amount = web3.utils.toWei('1', 'ether'); // 1 VFY

  console.log(`Teleporting ${web3.utils.fromWei(amount, 'ether')} tVFY`);
  console.log(`From: ${account.address} (parachain)`);
  console.log(`To: ${destinationAccount} (relay chain)`);

  // Estimate gas
  const gasEstimate = await contract.methods
    .teleportToRelayChain(destinationAccount, amount)
    .estimateGas({ from: account.address });

  console.log(`Estimated gas: ${gasEstimate}`);

  // Send transaction
  console.log('Sending transaction...');
  const result = await contract.methods
    .teleportToRelayChain(destinationAccount, amount)
    .send({
      from: account.address,
      gas: gasEstimate,
    });

  console.log('✅ Transaction successful!');
  console.log(`Transaction hash: ${result.transactionHash}`);
  console.log(`Block number: ${result.blockNumber}`);
  console.log(`Gas used: ${result.gasUsed}`);
}

testTeleport();
A couple of important notes:
- In this case, the
amountto be sent, doesn't require to specify 18 decimals. - The
destinationAccountis an hex public key of zkVerify. While from PolkadotJS-UI you can use the AccountID and PolkadotJS automatically performs the conversion to the correct format, in this case you need to do it manually. From PolkadotJS navigate toDeveloper-> Utilitiesand select theConvert Addresstab:
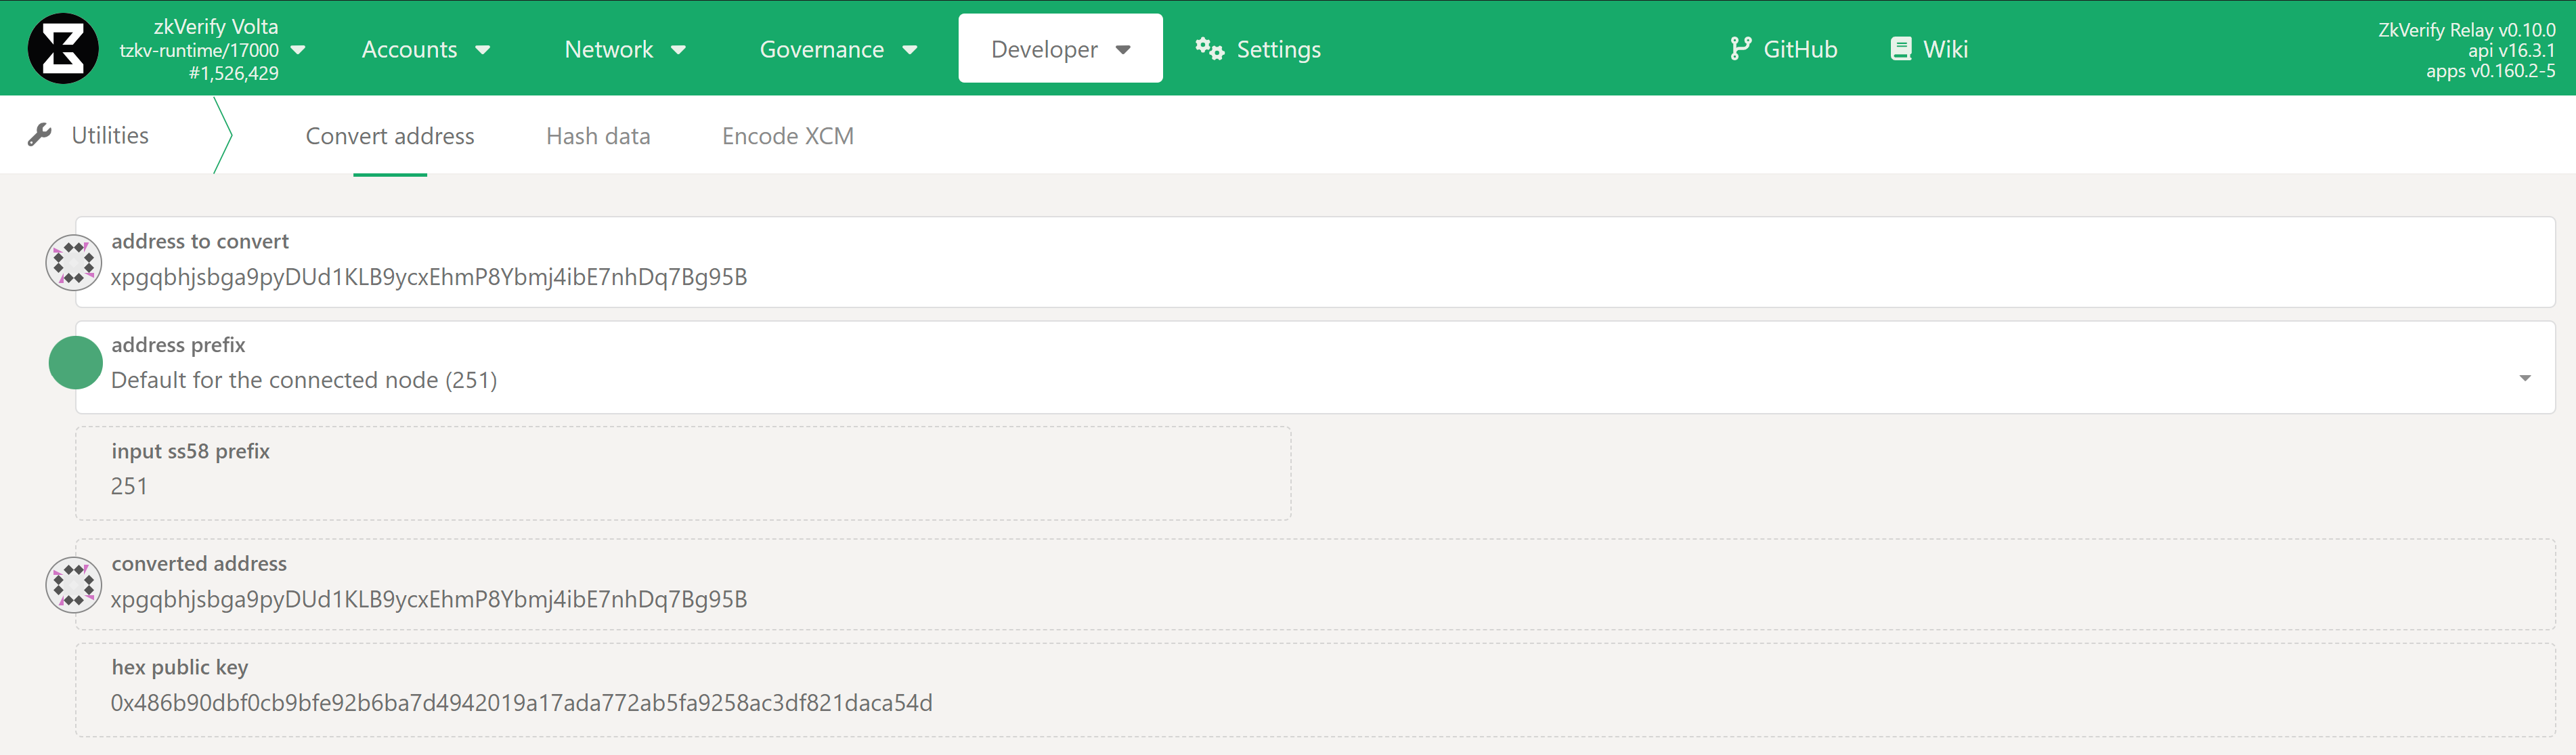
Just copy paste the account id in the address to convert field to automatically get the public key to use as destinationAccount.
Teleport via zkv-xcm-library
We've developed a Typescript library, called zkv-xcm-library, in order to simplify the creation of such XCM teleport extrinsics and for ease of integration with your app/frontend. Check the readme for installation and usage instructions.
A Note on XCM Teleport Fees
Since an XCM message is executed both on the Relay Chain and Parachain side, both sender and receiver need to pay for execution fees. However:
- The fees charged to the sender are deducted directly from its main balance. This happens immediately when the transaction is included in a block, before the teleport's burn logic is even executed. So, if after fee deduction your remaining balance is not enough to cover the burn logic, the transaction will fail.
- The fees charged to the receiver are deducted from the amount being teleported. This happens when the XCM message is executed on the Parachain side.