Generating Proofs
This guide will walk you through the process of generating compatible proofs which can be verified using zkVerify. You can navigate through all the supported proof types using the tabs below.
- Groth16
- Ultrahonk
- Ultraplonk
- Risc Zero
- SP1
- EZKL
We will be implementing a simple hash verification circuit with Circom and will use zkVerify to verify these proofs. The circuit we will be building is very simple where it takes a private input and a public input and just checks if the public input is the same as the Poseidon hash of the private input.
Steps Involved
- Creating the required circom circuit, downloading the artifacts and generating a proof
- Registering our verification key with zkVerify
- Verifying our zk proof and getting proof receipts
- Verifying the proof receipts on Ethereum
To start this tutorial, we will create our circuits using zkRepl, which is very beginner-friendly. We won’t be diving deep into Circom DSL, but we will explore all the required code snippets. As explained earlier, we will be having two inputs for our zk circuit in which one will be public and one will be private. And we will be using Poseidon Hash as our hash function in our circuit. To implement Poseidon Hash, we need to import corresponding libraries from circomlib.
Here’s the snippet of the implemented circuit :-
pragma circom 2.1.6;include "circomlib/poseidon.circom";template Example () {// Getting the inputs needed for our circuitsignal input a; // Actual Messagesignal input b; // Poseidon hash of the messagecomponent hash = Poseidon(1); // Creating our Poseidon component with one inputhash.inputs[0] <== a;log(hash.out);assert(b == hash.out); // Checking if the input hash is same as calculated hash}component main { public [ b ] } = Example();
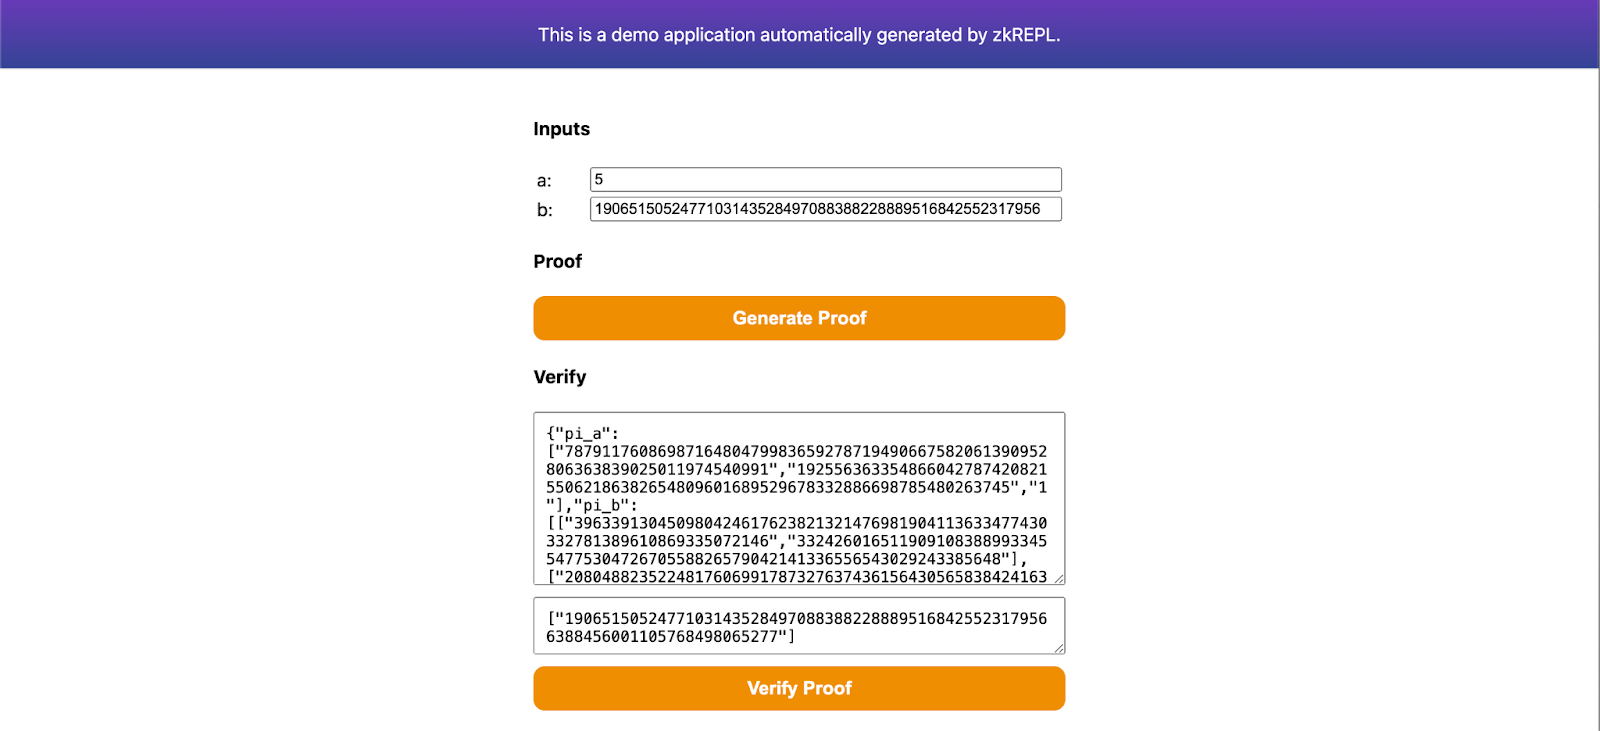
Over in zkRepl, we can generate our circuit artifacts as well which will be used to generate proofs for our circuit. We also need to pass our initial set of inputs to compile the circuits and generate the arctifacts. To do this, after the circuit we have a separate input code commented out, just change is as per our circuit.
/* INPUT = {"a": "5","b": "19065150524771031435284970883882288895168425523179566388456001105768498065277"} */
Then compile this circuit with zkRepl and get the required arctifacts. Next to generate proofs, click on the groth16 option given on the results tab. This will generate the required snarkjs embeddings to generate a zk proof for given inputs. Click on the main.groth16.html option to download the proof generator using which we can generate our groth16 proofs. Once downloaded, open it with any browser.
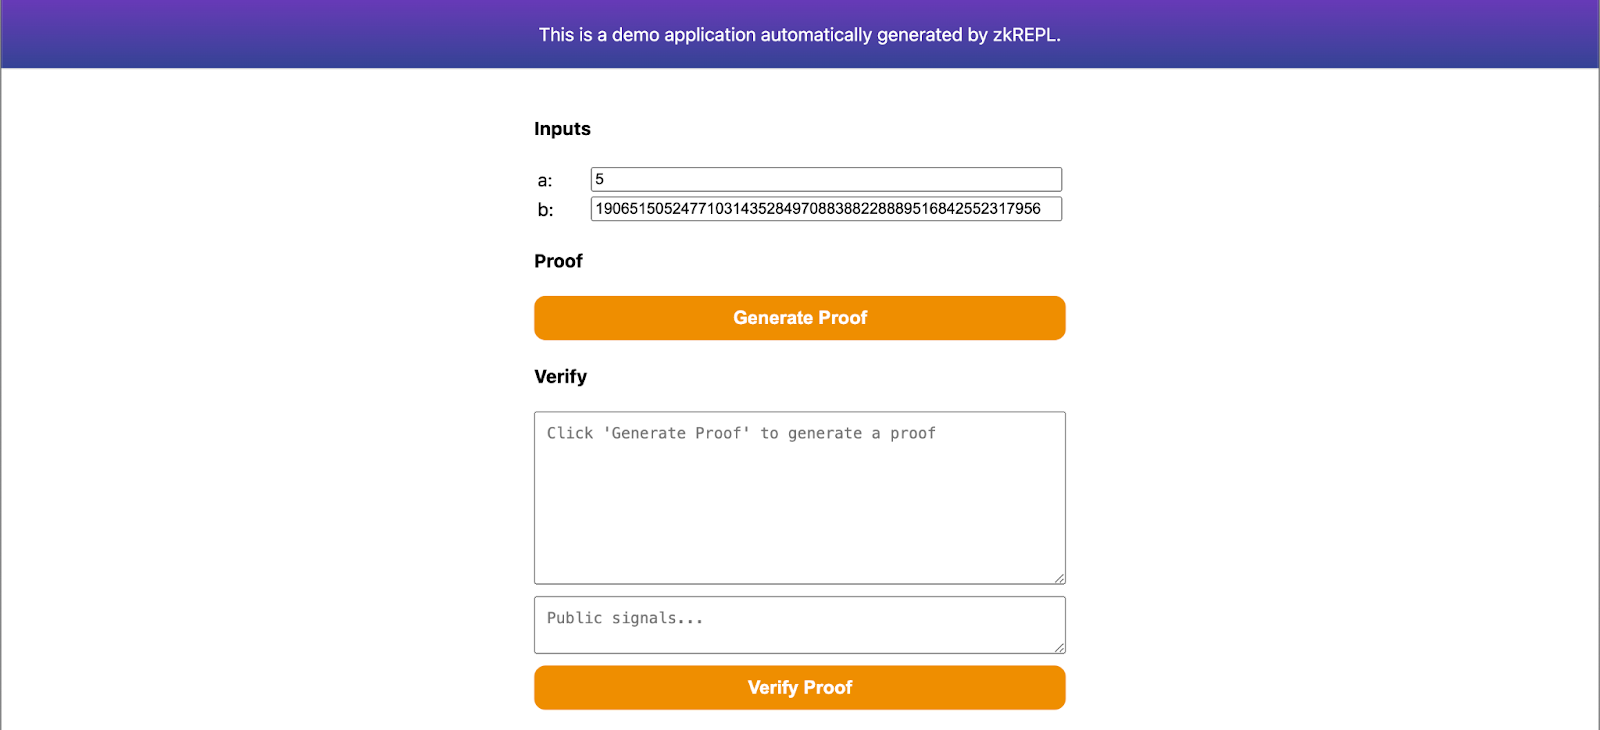
Specify your inputs and generate proof on this page. Then save the proof in proof.json file and public signals in public.json file. These files will be helpful while submitting our proofs for verification using zkVerify. Also, make sure to download main.groth16.vkey.json from zkRepl as well.
We will use the quickstart Noir Lang guide to generate an UltraHonk proof and will verify it on zkVerify. We will not be going in detail about Noir implementation, our focus would be on verifying those proofs efficiently on zkVerify.
Steps Involved
- Installing Noir using noirup, and also installing bb (Barretenberg's Backend) using bbup
- Generating Noir UltraHonk proofs
- Converting the proof, vk, and public inputs to required hex format using Bash
- Verifying our proofs on zkVerify and getting proof receipts
- Verifying the proof receipts on Ethereum
To start this tutorial, first we need to install the Noir toolkit using noirup tool. Also, to generate the proofs we need to install Barretenberg's Backend used by Noir Toolkit. Run the following commands to install the requirements:
- Install noirup by running the following command:
curl -L https://raw.githubusercontent.com/noir-lang/noirup/refs/heads/main/install | bash
- Running noirup will install the latest version of Noir Toolkit
noirup
- Install bbup by running the following command:
curl -L https://raw.githubusercontent.com/AztecProtocol/aztec-packages/refs/heads/master/barretenberg/bbup/install | bash
Our verifier is currently compatible with Noir proofs generated through bb and bb.js versions 3.0.0 and later.
- Install Barretenberg's Backend by running bbup command:
bbup -v <version>
- Create hello_world noir project using the following command:
nargo new hello_world
After implementing all the commands given above, you would have created the hello-world example Noir project. To learn more about this project you can check out Noir docs. Now we will generate proofs using the Noir toolkit for our hello_world project.
To generate proofs, first we need to create a Prover.toml file, which will hold our inputs for the hello_world noir circuit. You can either generate it manually, or by simply issuing the command nargo check. Populate the Prover.toml file with the inputs given below :
x = "1"y = "2"
Let's execute our hello_world circuit and get our witness value, which will be used to generate proofs and vk. Use the following command to execute:
nargo execute
Once we have generated our witness, we can generate proof and vk using the bb toolkit. Noir's implementation of the UltraHonk prover offers two flavors for its proofs: zero-knowledge (ZK) and non-zero-knowledge (Plain). The former is slightly slower but as the name suggests, the resulting proof is zero knowledge and thus, the verifier learns nothing about the secret input (witness). The latter is slightly faster, but the verifier can learn something about the witness from the proof. Use the following command to generate the required files, depending on which suits your specific needs:
- ZK
- Plain
# To generate zero-knowledge proof (using Keccak as the hash function)bb prove -t evm -b "./target/hello_world.json" -w "./target/hello_world.gz" -o ./target
# To generate a plain proof (using Keccak as the hash function)bb prove -t evm-no-zk -b "./target/hello_world.json" -w "./target/hello_world.gz" -o ./target
Then proceed to generating a vk depending on the flavor that you picked:
- EVM
- EVM-no-zk
# Generate vk for ZK proof (using Keccak as the hash function)bb write_vk -t evm -b "./target/hello_world.json" -o ./target
# Generate vk for Plain proof (using Keccak as the hash function)bb write_vk -t evm-no-zk -b "./target/hello_world.json" -o ./target
After running these commands, you will have three files, namely: proof, public_inputs, and vk inside the target folder which will be used for verification. As a final step, we will convert them to a format compatible with direct use with zkVerify. zkVerify supports both flavors for UltraHonk proofs, but you will need to explicitly convey which flavor was used to generate your proof during this final step. You can do this by setting the PROOF_TYPE variable in the script that follows to either ZK or Plain.
To convert the three files into hex format, run the following Bash script:
#!/usr/bin/env bashPROOF_TYPE="ZK" # Set to "Plain" if you are using the non-zk variant of UltraHonkARTIFACT_DIR_PATH="./target" # Adjust path depending on where the Noir-generated artifacts areOUTPUT_DIR_PATH="./target" # Adjust path based on where you would like the zkv-ready artifacts to be placed# You may ignore these:PROOF_FILE_PATH="${ARTIFACT_DIR_PATH}/proof"VK_FILE_PATH="${ARTIFACT_DIR_PATH}/vk"PUBS_FILE_PATH="${ARTIFACT_DIR_PATH}/public_inputs"ZKV_PROOF_HEX_FILE_PATH="${OUTPUT_DIR_PATH}/zkv_proof.hex"ZKV_VK_HEX_FILE_PATH="${OUTPUT_DIR_PATH}/zkv_vk.hex"ZKV_PUBS_HEX_FILE_PATH="${OUTPUT_DIR_PATH}/zkv_pubs.hex"# Get bb version and format it (e.g., 3.0.3 -> V3_0)BB_VERSION_FULL=$(bb --version | grep -oE '[0-9]+\.[0-9]+\.[0-9]+')# Extract major and minor, then join with underscoreBB_VERSION_KEY=$(echo "$BB_VERSION_FULL" | awk -F. '{print "V" $1 "_" $2}')# Convert proof to valid JSONif [ -f "${PROOF_FILE_PATH}" ]; thenPROOF_BYTES=$(xxd -p -c 1000000 "${PROOF_FILE_PATH}" | tr -d '\n')printf '{\n "%s": {\n "%s": "0x%s"\n }\n}\n' \"${BB_VERSION_KEY}" \"${PROOF_TYPE}" \"${PROOF_BYTES}" > "${ZKV_PROOF_HEX_FILE_PATH}"echo "✅ Generated ${ZKV_PROOF_HEX_FILE_PATH} with version key ${BB_VERSION_KEY}"elseecho "❌ Error: Proof file not found." >&2fi# Convert vk to hexadecimal format{if [ -f "${VK_FILE_PATH}" ]; thenprintf "\"0x%s\"\n" "$(xxd -p -c 0 "${VK_FILE_PATH}")" > "${ZKV_VK_HEX_FILE_PATH}"echo "✅ 'vk' hex file generated at ${ZKV_VK_HEX_FILE_PATH}."elseecho "❌ Error: Verification key file '${VK_FILE_PATH}' not found. Skipping." >&2fi}# Convert public inputs to hexadecimal format{if [ -f "${PUBS_FILE_PATH}" ]; thenxxd -p -c 32 "${PUBS_FILE_PATH}" | sed 's/.*/"0x&"/' | paste -sd, - | sed 's/.*/[&]/' > "${ZKV_PUBS_HEX_FILE_PATH}"echo "✅ 'pubs' hex file generated at ${ZKV_PUBS_HEX_FILE_PATH}."elseecho "❌ Error: Public inputs file '${PUBS_FILE_PATH}' not found. Skipping." >&2fi}
We will use the quickstart Noir Lang guide to generate an UltraPlonk proof and will verify it on zkVerify. We will not be going in detail about Noir implementation, our focus would be on verifying those proofs efficiently on zkVerify.
Steps Involved
- Installing Noir using noirup, and also installing bb (Barretenberg's Backend) using bbup
- Generating Noir UltraPlonk proofs
- Converting the proof and vk to required hex format using Noir-CLI
- Verifying our proofs on zkVerify and getting proof receipts
- Verifying the proof receipts on Ethereum
To start this tutorial, first we need to install the Noir toolkit using noirup tool. Also, to generate the proofs we need to install Barretenberg's Backend used by Noir Toolkit. Run the following commands to install the requirements:
- Install noirup by running the following command:
curl -L https://raw.githubusercontent.com/noir-lang/noirup/refs/heads/main/install | bash
- Running noirup will install the latest version of Noir Toolkit
noirup
- Install bbup by running the following command:
curl -L https://raw.githubusercontent.com/AztecProtocol/aztec-packages/refs/heads/master/barretenberg/bbup/install | bash
Starting from bbup v.0.87.0 Ultraplonk has been officially deprecated.
To keep submitting Noir proofs via zkVerify, please switch to a previous bbup version(recommended 0.76.4).
You can do this via the command:
bbup -v <version>
- Install Barretenberg's Backend by running bbup command:
bbup -v <version>
- Create hello_world noir project using the following command:
nargo new hello_world
After implementing all the commands given above, you would have created the hello-world example Noir project. To learn more about this project you can check out Noir docs. Now we will generate proofs using the Noir toolkit for our hello_world project.
To generate proofs, first we need to create a Prover.toml file, which will hold our inputs for the hello_world noir circuit. Populate the Prover.toml file with the inputs given below:
x = "1"y = "2"
Let's execute our hello_world circuit and get our witness value, which will be used to generate proofs and vk. Use the following command to execute:
nargo execute
Once we have generated our witness, we can generate proof and vk using the bb toolkit. Use the following command to generate the required files:
# To generate proofbb prove -b ./target/hello_world.json -w ./target/hello_world.gz -o ./target/proof# To generate vkbb write_vk -b ./target/hello_world.json -o ./target/vk
After running these commands, you will have two files, namely: proof and vk inside the target folder which will be used for verification.
This tutorial takes you through the process of building a Risc0 zkVM application.
After building the application, you can run it locally providing different inputs and it will give you back a proof of execution of its code. Then you can submit this proof on zkVerify Mainchain and check it gets correctly verified and included in a block.
Check out this section of Risc0 documentation for additional information on what a zkVM application is.
Prerequisites
- Risc0 installation requirements: check out these steps.
- Risc0 installation: check out these steps.
- Machine requirements: 16 GB RAM.
Note this tutorial is based on version 2.2.0 of Risc0 toolchain. Very likely you should be able to follow it using a more recent version, but in case you encounter any issue you can explicitly target that version with command rzup --version 2.2.0.
Building the application
In this tutorial you will build an application which receives a string as input, performs its sha256 hashing and returns back the hash as output. Leveraging the zero knowledge feature of Risc0 zkVM, you are able to show that you know some input that hashes to that specific output without actually showing the input. This use case can be significant for example when proving ownership of confidential data, like a password or a private key.
Make sure not to make confusion between application inputs and verification public inputs. When you run the application it is supposed you are in a private environment, you provide it with whatever application inputs you want and you have to keep them private; after the run, you get back the proof of execution and the outputs of the execution. The outputs can be safely shared with other parties, indeed they become the public inputs of the verification phase (performed by other parties).
In order to build the application, go through the following steps:
-
Initialize a new Risc0 project typing within a terminal:
cargo risczero new hasher --guest-name hasher_guestcd hasherThis will be your working directory.
-
Modify the host program (just consider it as the code that is running the zkVM):
-
Open the file
hasher/host/Cargo.tomlwith a text editor and add at the bottom the following lines:serde_json = "1.0.137"ciborium = "0.2.2"hex = "0.4.3" -
Open the file
hasher/host/src/main.rs. After all the imports add the following:use serde::Serialize;use std::{fs::File, io::Write};#[derive(Serialize)]pub struct Proof{proof: String,image_id: String,pub_inputs: String}And then replace these lines:
// For example:let input: u32 = 15 * u32::pow(2, 27) + 1;with the following code:
let input: String = std::env::args().nth(1).unwrap();println!("Input argument is: {}", input);and these lines:
// TODO: Implement code for retrieving receipt journal here.// For example:let _output: u32 = receipt.journal.decode().unwrap();with the following code:
let mut bin_receipt = Vec::new();ciborium::into_writer(&receipt, &mut bin_receipt).unwrap();let image_id_hex = hex::encode(HASHER_GUEST_ID.into_iter().flat_map(|v| v.to_le_bytes().into_iter()).collect::<Vec<_>>(),);let receipt_journal_bytes_array = &receipt.journal.bytes.as_slice();let proof = Proof{proof: "0x".to_string()+&hex::encode(&bin_receipt),image_id: "0x".to_string()+&image_id_hex,pub_inputs: "0x".to_string()+&hex::encode(&receipt_journal_bytes_array)};let json_string = serde_json::to_string_pretty(&proof).unwrap();let mut file = File::create("proof_output.json").unwrap();file.write_all(json_string.as_bytes()).unwrap();
In this way you have prepared the host to easily receive command-line argument and to save the proof json data in
proof.json, which will be useful in a later step when you need to submit them on the zkVerify Mainchain. -
-
Modify the guest program (just consider it as the code whose execution you want to prove and you want other to verify):
-
Open the file
hasher/methods/guest/Cargo.tomlwith a text editor and add at the bottom the following line:sha2 = "0.10" -
Open the file
hasher/methods/guest/src/main.rswith a text editor and overwrite its content with the following code:use risc0_zkvm::guest::env;use sha2::{Digest, Sha256};fn main() {// read the inputlet input: String = env::read();let mut hasher = Sha256::new();hasher.update(input.as_bytes()); // Update the hasher with the input byteslet result = hasher.finalize(); // Get the hash digestlet output = format!("{:x}", result); // Convert the hash digest to a hexadecimal string// write public output to the journalenv::commit(&output);}
Just a brief description of the above code: the program input is read, the computation is performed (hashing) and the output is written back.
-
-
From a terminal located at your working directory, build the project with:
cargo build --release
Running the application
You are now ready to run your application!
Open a terminal located at your working directory and type the command:
RISC0_DEV_MODE=0 cargo run --release -- "zkVerify is da best!"
Replacing zkVerify is da best! with your desired input.
In summary, the above command will:
- Start a Risc0 zkVM using the modified host program.
- Read the application input your provided as command line argument (
zkVerify is da best!in this case). - Perform an execution of the guest program and generate a proof of its execution.
- Print to the terminal the serialized proof and the serialized output.
- Perform an optional verification using the proof and the output (using them as verification public input) for double check.
Finally you need to save the following items:
- The serialized proof (
receipt_inner_bytes_arraystring). - The serialized outputs (
receipt_journal_bytes_array). - The guest program fingerprint, known as image id (
image_id_hex).
They will be used respectively as proof, public inputs and verification key during the verification phase.
Now that you have learned how to set up and run your Risc0 zkVM application you can play a bit with the guest program code and modify the execution logic.
Submitting a SP1 proof to zkVerify SP1 verification pallet requires first to generate a compressed SP1 proof.
To quickly try this out, you can follow the official SP1 quickstart guide for creating an example fibonacci application, and then execute the following code, in place of the provided script/main.rs:
use sp1_sdk::{include_elf, Prover, ProverClient, SP1Stdin};pub const FIBONACCI_ELF: &[u8] = include_elf!("fibonacci-program");fn main() {// Setup the inputs.let mut stdin = SP1Stdin::new();let n: u32 = 20;stdin.write(&n);// Setup the prover client.let client = ProverClient::from_env();// Setup the program for proving.let (pk, vk) = client.setup(FIBONACCI_ELF);// Generate the SP1 proof in compressed mode.let proof = client.prove(&pk, &stdin).compressed().run().expect("failed to generate proof");}
- With sp1_zkv_sdk
- Without sp1_zkv_sdk
After having obtained a compressed proof, it's necessary to post-process the proof (alongside the verification key, and public inputs) to obtain a serialized_proof, a vk_hash, and public_values as required by the SP1 verification pallet.
The sp1_zkv_sdk crate contains utility functions to perform the relevant conversions.
Add these following dependencies below the [dependencies] tab in your Cargo.toml file of the script folder:
bincode = { version = "2", features = ["serde"] }sp1-zkv-sdk = { git="https://github.com/zkVerify/sp1-verifier" }
And then add the following imports to your script/Cargo.toml:
use sp1_zkv_sdk::*; // for the `convert_to_zkv` and `hash_bytes` methods.use std::{fs::File, io::Write};use serde::{Deserialize, Serialize};// Struct of the output we need#[derive(Serialize, Deserialize)]struct Output{image_id: String,pub_inputs: String,proof: String}// Helper function to get hex stringsfn to_hex_with_prefix(bytes: &[u8]) -> String {let hex_string: String = bytes.iter().map(|b| format!("{:02x}", b)).collect();format!("0x{}", hex_string)}
Now, add these lines after the proof is generated by the SP1 prover sdk:
// Convert proof and vk into a zkVerify-compatible proof.let SP1ZkvProofWithPublicValues {proof: shrunk_proof,public_values,} = client.convert_proof_to_zkv(proof, Default::default()).unwrap();let vk_hash = vk.hash_bytes();// Serialize the prooflet serialized_proof = bincode::serde::encode_to_vec(&shrunk_proof, bincode::config::legacy()).expect("failed to serialize proof");// Convert to required structlet output = Output{proof: to_hex_with_prefix(&serialized_proof),image_id: to_hex_with_prefix(&vk_hash),pub_inputs: to_hex_with_prefix(&public_values),};// Convert to JSON and store in the filelet json_string = serde_json::to_string_pretty(&output).expect("Failed to serialize to JSON.");let mut file = File::create("proof.json").unwrap();file.write_all(json_string.as_bytes()).unwrap();
If you'd rather not depend on sp1_zkv_sdk in your application, the following sections show code snippets to perform the required conversions.
First you would need to add these following dependencies below the [dependencies] tab in your Cargo.toml file of the script folder:
bincode = { version = "2", features = ["serde"] }
Next we need to import all the important modules and create a structure to store our proof. Add these following lines after all the imports in script/Cargo.toml file:
use sp1_sdk::HashableKey; // for the `hash_babybear` method.use std::{fs::File, io::Write};use serde::{Deserialize, Serialize};// Struct of the output we need#[derive(Serialize, Deserialize)]struct Output{image_id: String,pub_inputs: String,proof: String}// Helper function to get hex stringsfn to_hex_with_prefix(bytes: &[u8]) -> String {let hex_string: String = bytes.iter().map(|b| format!("{:02x}", b)).collect();format!("0x{}", hex_string)}
Proof
The SP1 verification pallet supports shrunk STARK proofs. Here's the code to generate it from the proof obtained in the section Proof generation, you need to paste this after the proof is generated by the SP1 prover SDK:
// Extract the inner compressed proof.let compressed_proof = proof.proof.try_as_compressed().expect("proof is not compressed");// Shrink the compressed proof.let SP1ReduceProof {vk,proof: shard_proof,} = client.inner().shrink(*compressed_proof, Default::default()).expect("failed to shrink");let input = SP1CompressWitnessValues {vks_and_proofs: vec![(vk.clone(), shard_proof.clone())],is_complete: true,};let proof_with_vk_and_merkle = self.inner().make_merkle_proofs(input);let zkv_proof = Proof {shard_proof,vk,vk_merkle_proof: proof_with_vk_and_merkle.merkle_val.vk_merkle_proofs[0].clone(),}// Serialize the shrunk_prooflet serialized_proof = bincode::serde::encode_to_vec(&zkv_proof, bincode::config::legacy()).expect("failed to serialize proof");
Verification Key
The SP1 verification pallet accepts verification keys hashed with the hash_babybear method, and serialized as little endian bytes. Here's a code snippet showing the process:
// `vk` is the verification key obtained from `ProverClient::setup` method.let vk_hash: [u8; 32] = vk.hash_bytes();
Public Values
SP1 verification pallet accepts public inputs expressed as a vector of bytes, which can be retrieved from the initial SP1ProofWithPublicValues proof:
let public_values = proof.public_values.to_vec();
Storing the output
Once we have generated all the proof artifacts, we will store it in a json file which will be used later while verification. Paste the following code snippet to store your artifacts into the required structure:
let output = Output{proof: to_hex_with_prefix(&serialized_proof),image_id: to_hex_with_prefix(&vk_hash),pub_inputs: to_hex_with_prefix(&public_values),};let json_string = serde_json::to_string_pretty(&output).expect("Failed to serialize to JSON.");let mut file = File::create("proof.json").unwrap();file.write_all(json_string.as_bytes()).unwrap();
We will use the quickstart guide by zkonduit in order to generate an EZKL proof, and we will then verify it on zkVerify. We will not be going into detail about EZKL's implementation, our focus would be on verifying those proofs efficiently on zkVerify.
Steps Involved
- Installing EZKL and dependencies
- Defining a model and exporting it to ONNX format
- Generating EZKL proofs
- Converting the proof, vk, and instances (public inputs) to required hex format using Bash
- Verifying our proofs on zkVerify and getting proof receipts
- Verifying the proof receipts on Ethereum
To start this tutorial, first we need to install the EZKL zkML library. For the purposes of this tutorial, we will be primarily using the Bash CLI. However, for defining our toy model, we will rely on Python3 and PyTorch. Other frameworks should also be compatible, as long as you are able to export your model into .onnx format. For alternatives, please consult the EZKL documentation by zkonduit and the ONNX documentation. Use of a virtual environment is recommended. Run the following commands to install the requirements:
- Install ezkl by running the following command:
curl https://raw.githubusercontent.com/zkonduit/ezkl/main/install_ezkl_cli.sh | bash
- Install ONNX:
pip install onnx
- Install PyTorch:
pip install torch torchvision
- Define your model, export it to
network.onnx, and create aninput.jsonfile:
Important: If you already have an exported model (network.onnx) and inputs file (input.json), you may skip this step completely.
For illustration, let's create a Python script defining a simple model that learns the linear function . We will call it export_model.py.
import torchimport torch.nn as nnimport jsonimport os# 1. DEFINE THE PYTORCH MODELclass SimpleModel(nn.Module):def __init__(self):super(SimpleModel, self).__init__()self.linear = nn.Linear(1, 1)# Manually set weights to learn y = 2x + 1self.linear.weight.data.fill_(2.0)self.linear.bias.data.fill_(1.0)def forward(self, x):return self.linear(x)# 2. EXPORT TO ONNXmodel = SimpleModel()model.eval()# Define a dummy input for the ONNX exportdummy_input = torch.randn(1, 1)onnx_path = "network.onnx"torch.onnx.export(model, dummy_input, onnx_path, export_params=True, input_names=['input'], output_names=['output'])print(f"Model exported to {onnx_path}")# 3. CREATE THE INPUT DATA FILE# Let's test with an input of x = 2. We expect the output to be 2*2 + 1 = 5input_data = dict(input_data = [[2.0]])json_path = "input.json"with open(json_path, 'w') as f:json.dump(input_data, f)print(f"Input data saved to {json_path}")
Grant the script execution permissions by running chmod +x export_model.py from a Bash shell and then run it by issuing the command python3 export_model.py. After the script finishes, you should have two files, namely, network.onnx and input.json. We are now ready to start using ezkl.
- Generate Settings:
The first command that you need to issue to
ezklis for generating the initial circuit parameters for your model. To inspect the model and create such a configuration file, run:
ezkl gen-settings -M network.onnx -O settings.json
This should generate settings.json.
- Calibrate Settings (Optional):
This step is optional, but crucial as it runs a mock forward pass to determine the best fixed-point scaling for the numbers in your model. This step essentially fine-tunes your settings.json parameters to better match your actual model and data, which in turn helps prevent proofs from failing due to arithmetic errors. You will need to provide a calibration.json data file to the calibrate-settings command. The data in this file must match the (tensor) shape and structure of input.json, differing only in the specific values used (which should be representative, not dummy). ezkl can use this data to automatically tune and optimize the circuit settings (e.g., scales, constraints, and logrows). For the purpose of this tutorial, we will keep things simple and use input.json as our calibration data file. To commence calibration, run:
ezkl calibrate-settings -D input.json -M network.onnx --settings-path settings.json
This modifies settings.json with optimal parameters.
- Compile the Model:
This step transforms your neural network into an arithmetic circuit, the fundamental object for which we can create proofs. Run:
ezkl compile-circuit -M network.onnx --settings-path settings.json --compiled-circuit model.compiled
This should generate the model.compiled file which contains an optimized format of the model for zero-knowledge proofs.
- Download the relevant SRS file:
You will need to download a Structured Reference String (SRS) file according to what commitment scheme you are using (by default, that's KZG) and the number of logrows. This information is specified in your circuit settings file. To commence the download, issue the command:
ezkl get-srs -S settings.json
By default, any downloaded SRS is saved in ~/.ezkl/srs.
- Run the Trusted Setup to generate the cryptographic keys:
Run the command:
ezkl setup -M model.compiled --pk-path pk.key --vk-path vk.key
You should now have a proving key (for the prover) in pk.key and a verification key (for the verifier) in vk.key.
- Generate the witness:
This step creates a witness file from your input data and compiled model. Simply run:
ezkl gen-witness -M model.compiled -D input.json -V vk.key -O witness.json
This should generate the witness.json file.
- Prove:
To generate a zero-knowledge proof using the witness and other artifacts, run:
ezkl prove -M model.compiled --pk-path pk.key --proof-path proof.json -W witness.json
and you should now have a JSON file called proof.json. This file contains both the proof and the instances (public inputs).
- Generate the VKA:
The Reusable EZKL verifier relies on an additional artifact called the Verification Key Artifact (or, VKA for short). To generate it, simply run:
ezkl create-evm-vka -S settings.json --vk-path vk.key --vka-path vka.bytes
and you should now have an additional file called vka.bytes.
You are almost set. The artifacts proof.json and vka.bytes contain all the information necessary for verifying the proof with zkVerify. The final step consists of extracting this data, and converting them to a format compatible for direct use with zkVerify.
To accomplish this, issue the following Bash commands:
# Convert vka to hexadecimal formattail -c +9 vka.bytes | xxd -p | tr -d '\n' | sed 's/.*/`{"vkBytes": "0x&"}`/' > zkv_vk.hex# Convert proof to hexadecimal formatjq -r '.proof[] | select(type == "number")' proof.json | awk 'BEGIN {printf "\"0x"} {printf "%02x", $1} END {printf "\"\n"}' > zkv_proof.hex# Convert instances (public inputs) to hexadecimal formatecho "[$(jq -r '.pretty_public_inputs.outputs | flatten | map("\"\(.)\"") | join(", ")' proof.json)]" > zkv_pubs.hex
After generating proofs, there are multiple ways in which you can verify it on zkVerify. The recommended way to verify proofs on zkVerify is by using the Kurier. You can verify proofs using anyone of the following :-
- Using Kurier
- Using zkVerifyJS package
- Using Polkadot.js frontend
- Using the subxt rust crate