生成证明
本指南介绍如何生成可由 zkVerify 验证的兼容证明。可通过下方标签查看各证明类型的操作步骤。
- Groth16
- Ultrahonk
- Ultraplonk
- Risc Zero
- SP1
- EZKL
我们将用 Circom 实现一个简单的哈希验证电路,并通过 zkVerify 验证。电路接受一个私有输入和一个公共输入,检查公共输入是否等于私有输入的 Poseidon 哈希。
步骤
- 编写 circom 电路,下载产物并生成证明
- 在 zkVerify 注册 verification key
- 验证 zk 证明并获取证明凭证
- 在以太坊上验证证明凭证
本教程使用对新手友好的 zkRepl 创建电路,不深入 Circom DSL,只展示必要代码。电路包含一个公共输入和一个私有输入,使用 Poseidon 哈希;需从 circomlib 引入相关库。
电路示例如下:
pragma circom 2.1.6;include "circomlib/poseidon.circom";template Example () {// Getting the inputs needed for our circuitsignal input a; // Actual Messagesignal input b; // Poseidon hash of the messagecomponent hash = Poseidon(1); // Creating our Poseidon component with one inputhash.inputs[0] <== a;log(hash.out);assert(b == hash.out); // Checking if the input hash is same as calculated hash}component main { public [ b ] } = Example();
在 zkRepl 可生成用于证明的电路产物。编译并生成产物时需提供初始输入,修改下方注释的输入片段即可:
/* INPUT = {"a": "5","b": "19065150524771031435284970883882288895168425523179566388456001105768498065277"} */
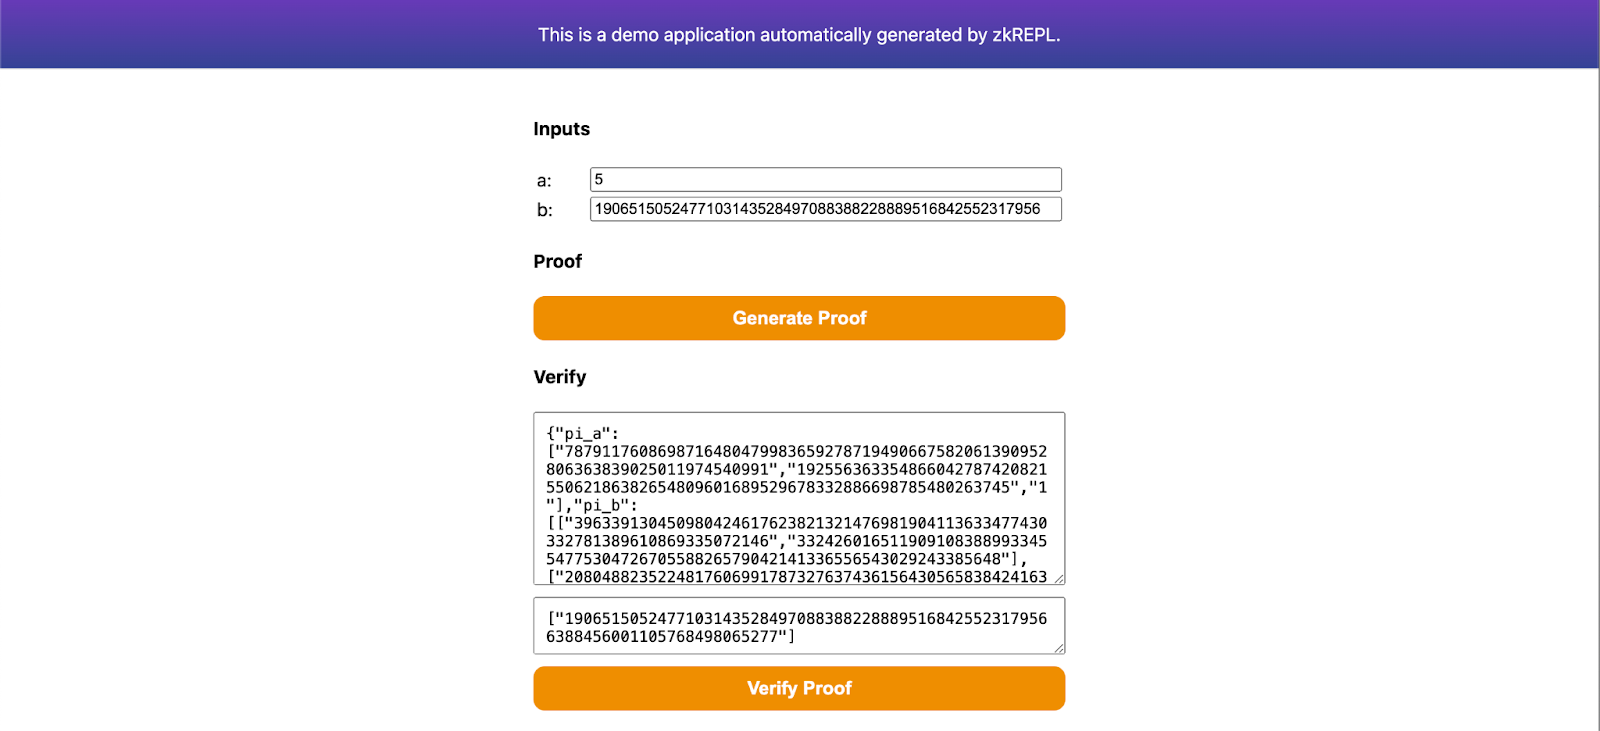
在 zkRepl 编译电路并获取产物。生成证明时,点击结果页的 groth16 选项,获取生成证明所需的 snarkjs 嵌入。下载 main.groth16.html 作为证明生成器,用浏览器打开即可。
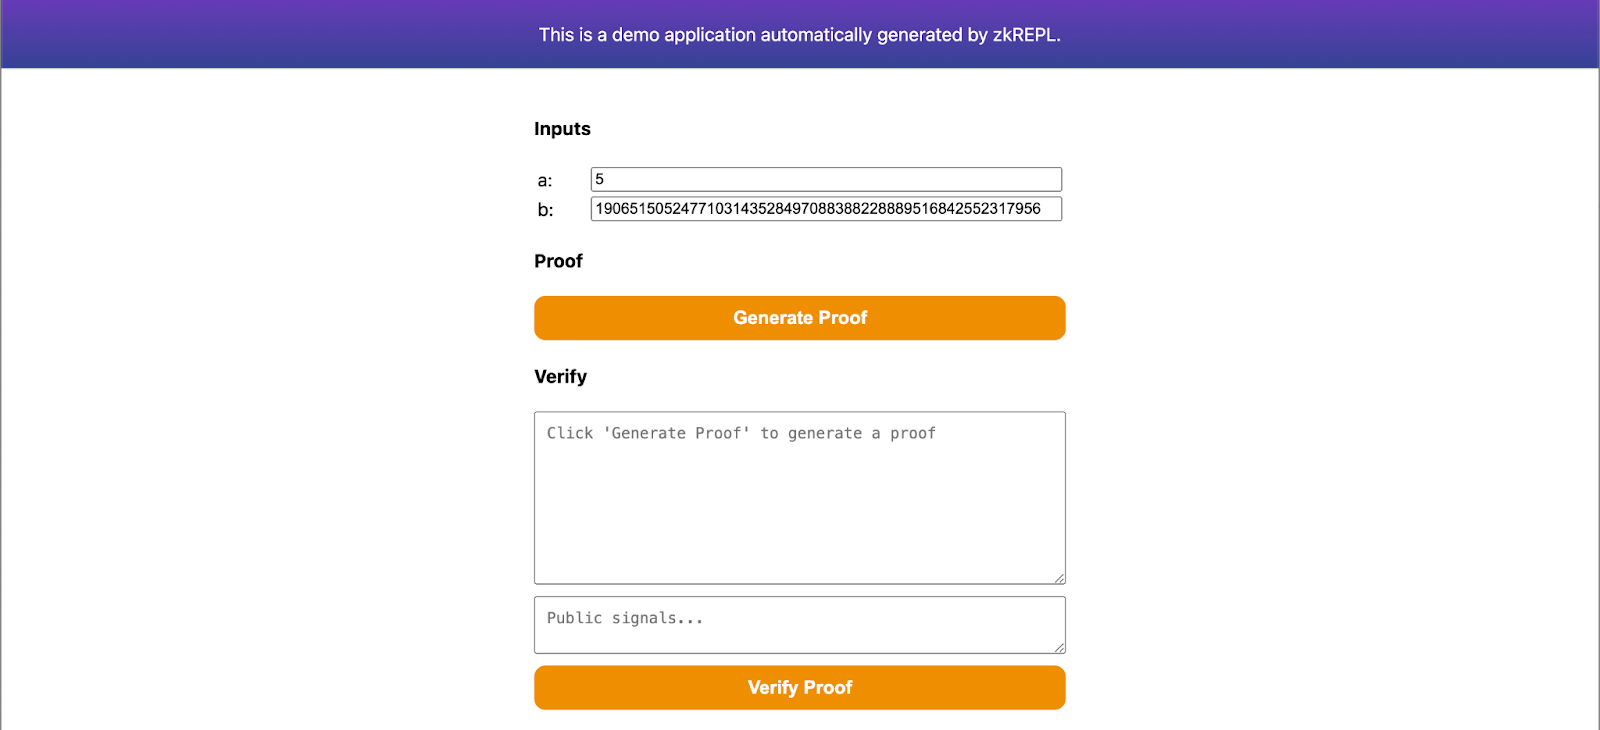
在页面填写输入并生成证明,将 proof 保存为 proof.json,公共信号保存为 public.json,提交 zkVerify 验证时会用到。同时下载 main.groth16.vkey.json。
我们将按照 Noir Lang 的快速入门生成 UltraHonk 证明,并在 zkVerify 上验证。不会深入 Noir 细节,重点是高效验证。
步骤
- 使用 noirup 安装 Noir,使用 bbup 安装 bb(Barretenberg Backend)
- 生成 Noir UltraHonk 证明
- 用 Bash 将 proof、vk、public inputs 转为所需 hex 格式
- 在 zkVerify 验证并获取证明凭证
- 在以太坊验证证明凭证
先用 noirup 安装 Noir 工具链,并安装 Noir 使用的 Barretenberg Backend。执行:
- 运行以下命令安装
noirup:
curl -L https://raw.githubusercontent.com/noir-lang/noirup/refs/heads/main/install | bash
- 运行
noirup安装最新版 Noir Toolkit:
noirup
- 运行以下命令安装
bbup:
curl -L https://raw.githubusercontent.com/AztecProtocol/aztec-packages/refs/heads/master/barretenberg/bbup/install | bash
当前 verifier 兼容 bb/bb.js 生成的 Noir 证明版本在 v0.84.0 及以上、不包含 v0.86.*。
- 使用
bbup安装 Barretenberg Backend:
bbup -v <version>
- 创建 hello_world Noir 项目:
nargo new hello_world
执行完上述命令后即可得到 hello-world 示例项目,更多见 Noir docs。接下来为 hello_world 生成证明。
生成证明前先创建 Prover.toml,存放 hello_world 电路输入。可手动创建或运行 nargo check 生成,填入:
x = "1"y = "2"
执行电路获取 witness,用于生成证明和 vk:
nargo execute
获得 witness 后,用 bb 生成 proof 与 vk。UltraHonk prover 有 ZK 与 Plain 两种:ZK 略慢但零知识,Plain 略快但可能泄露 witness 信息。根据需求选择:
- ZK
- Plain
# To generate zero-knowledge proofbb prove -s ultra_honk -b ./target/hello_world.json -w ./target/hello_world.gz -o ./target --oracle_hash keccak --zk
# To generate a plain proofbb prove -s ultra_honk -b ./target/hello_world.json -w ./target/hello_world.gz -o ./target --oracle_hash keccak
无论选择哪种,生成 vk 相同:
# To generate vkbb write_vk -s ultra_honk -b ./target/hello_world.json -o ./target --oracle_hash keccak
完成后,target 目录会有 proof、public_inputs、vk,用于验证。最后将其转换为 zkVerify 直接使用的格式。zkVerify 支持两种 UltraHonk 证明,但需在转换时通过 PROOF_TYPE 指定 ZK 或 Plain。
运行以下脚本将三文件转为 hex:
#!/usr/bin/env bashPROOF_TYPE="ZK" # Set to "Plain" if you are using the non-zk variant of UltraHonkPROOF_FILE_PATH="./target/proof" # Adjust path depending on where the Noir-generated proof file isVK_FILE_PATH="./target/vk" # Adjust path depending on where the Noir-generated vk file isPUBS_FILE_PATH="./target/public_inputs" # Adjust path depending on where the Noir-generated public_inputs file is# You may ignore these:ZKV_PROOF_HEX_FILE_PATH="./target/zkv_proof.hex"ZKV_VK_HEX_FILE_PATH="./target/zkv_vk.hex"ZKV_PUBS_HEX_FILE_PATH="./target/zkv_pubs.hex"# Convert proof to hexadecimal format{if [ -f "$PROOF_FILE_PATH" ]; thenPROOF_BYTES=$(xxd -p -c 256 "$PROOF_FILE_PATH" | tr -d '\n')printf '`{\n "%s:" "0x%s"\n}`\n' "$PROOF_TYPE" "$PROOF_BYTES" > "$ZKV_PROOF_HEX_FILE_PATH"echo "✅ 'proof' hex file generated at ${ZKV_PROOF_HEX_FILE_PATH}."elseecho "❌ Error: Proof file '$PROOF_FILE_PATH' not found. Skipping." >&2fi}# Convert vk to hexadecimal format{if [ -f "$VK_FILE_PATH" ]; thenprintf "\"0x%s\"\n" "$(xxd -p -c 0 "$VK_FILE_PATH")" > "$ZKV_VK_HEX_FILE_PATH"echo "✅ 'vk' hex file generated at ${ZKV_VK_HEX_FILE_PATH}."elseecho "❌ Error: Verification key file '$VK_FILE_PATH' not found. Skipping." >&2fi}# Convert public inputs to hexadecimal format{if [ -f "$PUBS_FILE_PATH" ]; thenxxd -p -c 32 "$PUBS_FILE_PATH" | sed 's/.*/"0x&"/' | paste -sd, - | sed 's/.*/[&]/' > "$ZKV_PUBS_HEX_FILE_PATH"echo "✅ 'pubs' hex file generated at ${ZKV_PUBS_HEX_FILE_PATH}."elseecho "❌ Error: Public inputs file '$PUBS_FILE_PATH' not found. Skipping." >&2fi}
本节略,原文未提供额外步骤,可参考 UltraHonk 转换与提交流程,使用相应的 Ultraplonk 生成器与输入。
我们将使用 Noir Lang 的快速入门生成 UltraPlonk proof,并在 zkVerify 上验证。这里不会深入讲解 Noir 的实现细节,重点是如何高效地在 zkVerify 上验证这些 proof。
步骤
- 使用
noirup安装 Noir,并使用bbup安装 bb(Barretenberg Backend) - 生成 Noir UltraPlonk proof
- 使用 Noir-CLI 将 proof 和 vk 转换为所需的 hex 格式
- 在 zkVerify 上验证 proof 并获得 proof receipt
- 在以太坊上验证 proof receipt
开始本教程前,首先需要用 noirup 安装 Noir 工具链。为了生成 proof,还需要安装 Noir Toolkit 使用的 Barretenberg Backend。请执行以下命令安装这些依赖:
- 运行以下命令安装
noirup:
curl -L https://raw.githubusercontent.com/noir-lang/noirup/refs/heads/main/install | bash
- 运行
noirup安装最新版 Noir Toolkit:
noirup
- 运行以下命令安装
bbup:
curl -L https://raw.githubusercontent.com/AztecProtocol/aztec-packages/refs/heads/master/barretenberg/bbup/install | bash
Starting from bbup v.0.87.0 Ultraplonk has been officially deprecated.
To keep submitting Noir proofs via zkVerify, please switch to a previous bbup version(recommended 0.76.4).
You can do this via the command:
bbup -v <version>
- 运行
bbup安装 Barretenberg Backend:
bbup -v <version>
- 使用以下命令创建
hello_worldNoir 项目:
nargo new hello_world
执行完以上命令后,你就创建好了 hello-world 示例 Noir 项目。想进一步了解这个项目,可以阅读 Noir docs。接下来我们会为 hello_world 项目生成 proof。
要生成 proof,首先需要创建一个 Prover.toml 文件,用来保存 hello_world Noir 电路的输入。请按下列内容填写:
x = "1"y = "2"
接着执行 hello_world 电路并获得 witness,它会用于生成 proof 和 vk。执行以下命令:
nargo execute
生成 witness 后,就可以用 bb 工具生成 proof 和 vk。执行以下命令生成所需文件:
# To generate proofbb prove -b ./target/hello_world.json -w ./target/hello_world.gz -o ./target/proof# To generate vkbb write_vk -b ./target/hello_world.json -o ./target/vk
执行完这些命令后,你会在 target 目录下得到 proof 和 vk 两个文件,后续验证会用到它们。
请结合 Risc Zero 官方教程生成证明,之后在 zkVerifyJS 或 PolkadotJS 提交时按 Risc Zero 选项填写 proof、image_id 与 public inputs,并指定 Domain ID。
本教程将带你完成一个 Risc0 zkVM 应用的构建过程。
应用构建完成后,你可以在本地传入不同输入运行它,它会返回一份代码执行证明。之后你可以把这份 proof 提交到 zkVerify Mainchain,并检查它是否被正确验证并写入区块。
如果你想进一步了解 zkVM 应用是什么,可以阅读 Risc0 文档中的 这一节。
前置条件
注意:本教程基于 Risc0 toolchain 2.2.0 版本编写。大概率也可以使用更新版本,但如果遇到问题,可以显式切换到该版本:rzup --version 2.2.0。
构建应用
在本教程中,你将构建一个应用:它接收一个字符串输入,对其执行 sha256 哈希,并把哈希结果作为输出返回。借助 Risc0 zkVM 的零知识特性,你可以证明自己知道某个输入能产生该输出,而无需公开输入本身。这个场景在证明敏感数据的所有权时很有用,例如密码或私钥。
请不要混淆 application inputs 和 verification public inputs。运行应用时,默认你处于私有环境,可以提供任意 application inputs,并且这些输入应保持私密;运行结束后,你会得到执行 proof 和执行输出。输出可以安全地分享给其他人,因为它们会成为验证阶段的 public inputs。
要构建这个应用,请按以下步骤进行:
-
在终端中初始化一个新的 Risc0 项目:
cargo risczero new hasher --guest-name hasher_guestcd hasher这将成为你的工作目录。
-
修改 host 程序(可将其理解为运行 zkVM 的那部分代码):
-
Open the file
hasher/host/Cargo.tomlwith a text editor and add at the bottom the following lines:serde_json = "1.0.137"ciborium = "0.2.2"hex = "0.4.3" -
Open the file
hasher/host/src/main.rs. After all the imports add the following:use serde::Serialize;use std::{fs::File, io::Write};#[derive(Serialize)]pub struct Proof{proof: String,image_id: String,pub_inputs: String}And then replace these lines:
// For example:let input: u32 = 15 * u32::pow(2, 27) + 1;with the following code:
let input: String = std::env::args().nth(1).unwrap();println!("Input argument is: {}", input);and these lines:
// TODO: Implement code for retrieving receipt journal here.// For example:let _output: u32 = receipt.journal.decode().unwrap();with the following code:
let mut bin_receipt = Vec::new();ciborium::into_writer(&receipt, &mut bin_receipt).unwrap();let image_id_hex = hex::encode(HASHER_GUEST_ID.into_iter().flat_map(|v| v.to_le_bytes().into_iter()).collect::<Vec<_>>(),);let receipt_journal_bytes_array = &receipt.journal.bytes.as_slice();let proof = Proof{proof: "0x".to_string()+&hex::encode(&bin_receipt),image_id: "0x".to_string()+&image_id_hex,pub_inputs: "0x".to_string()+&hex::encode(&receipt_journal_bytes_array)};let json_string = serde_json::to_string_pretty(&proof).unwrap();let mut file = File::create("proof_output.json").unwrap();file.write_all(json_string.as_bytes()).unwrap();
In this way you have prepared the host to easily receive command-line argument and to save the proof json data in
proof.json, which will be useful in a later step when you need to submit them on the zkVerify Mainchain. -
-
Modify the guest program (just consider it as the code whose execution you want to prove and you want other to verify):
-
Open the file
hasher/methods/guest/Cargo.tomlwith a text editor and add at the bottom the following line:sha2 = "0.10" -
Open the file
hasher/methods/guest/src/main.rswith a text editor and overwrite its content with the following code:use risc0_zkvm::guest::env;use sha2::{Digest, Sha256};fn main() {// read the inputlet input: String = env::read();let mut hasher = Sha256::new();hasher.update(input.as_bytes()); // Update the hasher with the input byteslet result = hasher.finalize(); // Get the hash digestlet output = format!("{:x}", result); // Convert the hash digest to a hexadecimal string// write public output to the journalenv::commit(&output);}
Just a brief description of the above code: the program input is read, the computation is performed (hashing) and the output is written back.
-
-
From a terminal located at your working directory, build the project with:
cargo build --release
运行应用
现在你已经可以运行应用了。
在工作目录打开终端,执行以下命令:
RISC0_DEV_MODE=0 cargo run --release -- "zkVerify is da best!"
你可以将 zkVerify is da best! 替换成自己想测试的输入。
总结一下,上面的命令会:
- 使用修改后的 host 程序启动一个 Risc0 zkVM。
- 读取你通过命令行参数提供的 application input(这里是
zkVerify is da best!)。 - 执行 guest 程序,并生成执行 proof。
- 在终端打印序列化后的 proof 和序列化后的输出。
- 使用 proof 和输出(把输出作为 verification public input)做一次可选的本地验证,作为双重确认。
最后,你需要保存以下内容:
- 序列化后的 proof(
receipt_inner_bytes_array字符串)。 - 序列化后的输出(
receipt_journal_bytes_array)。 - guest 程序的指纹,也就是 image id(
image_id_hex)。
它们会在后续验证阶段分别作为 proof、public inputs 和 verification key 使用。
现在你已经学会了如何搭建并运行 Risc0 zkVM 应用,可以继续修改 guest 程序代码,尝试调整执行逻辑。
将 SP1 proof 提交给 zkVerify 的 SP1 verification pallet 之前,需要先生成一个 compressed SP1 proof。
如果你想快速试一遍,可以先按照 官方 SP1 quickstart guide 创建一个 fibonacci 示例应用,然后用下面这段代码替换 script/main.rs:
use sp1_sdk::{include_elf, Prover, ProverClient, SP1Stdin};pub const FIBONACCI_ELF: &[u8] = include_elf!("fibonacci-program");fn main() {// Setup the inputs.let mut stdin = SP1Stdin::new();let n: u32 = 20;stdin.write(&n);// Setup the prover client.let client = ProverClient::from_env();// Setup the program for proving.let (pk, vk) = client.setup(FIBONACCI_ELF);// Generate the SP1 proof in compressed mode.let proof = client.prove(&pk, &stdin).compressed().run().expect("failed to generate proof");}
- With sp1_zkv_sdk
- Without sp1_zkv_sdk
获得 compressed proof 之后,还需要对 proof、verification key 和 public inputs 做后处理,生成 SP1 verification pallet 所需的 serialized_proof、vk_hash 和 public_values。
sp1_zkv_sdk crate 提供了完成这些转换的辅助函数。
请在 script 目录下的 Cargo.toml 中,把下列依赖加入 [dependencies]:
bincode = { version = "2", features = ["serde"] }sp1-zkv-sdk = { git="https://github.com/zkVerify/sp1-verifier" }
然后在代码中加入以下 imports:
use sp1_zkv_sdk::*; // for the `convert_to_zkv` and `hash_bytes` methods.use std::{fs::File, io::Write};use serde::{Deserialize, Serialize};// Struct of the output we need#[derive(Serialize, Deserialize)]struct Output{image_id: String,pub_inputs: String,proof: String}// Helper function to get hex stringsfn to_hex_with_prefix(bytes: &[u8]) -> String {let hex_string: String = bytes.iter().map(|b| format!("{:02x}", b)).collect();format!("0x{}", hex_string)}
接着,在 SP1 prover SDK 生成 proof 之后,补上以下代码:
// Convert proof and vk into a zkVerify-compatible proof.let SP1ZkvProofWithPublicValues {proof: shrunk_proof,public_values,} = client.convert_proof_to_zkv(proof, Default::default()).unwrap();let vk_hash = vk.hash_bytes();// Serialize the prooflet serialized_proof = bincode::serde::encode_to_vec(&shrunk_proof, bincode::config::legacy()).expect("failed to serialize proof");// Convert to required structlet output = Output{proof: to_hex_with_prefix(&serialized_proof),image_id: to_hex_with_prefix(&vk_hash),pub_inputs: to_hex_with_prefix(&public_values),};// Convert to JSON and store in the filelet json_string = serde_json::to_string_pretty(&output).expect("Failed to serialize to JSON.");let mut file = File::create("proof.json").unwrap();file.write_all(json_string.as_bytes()).unwrap();
如果你不想在应用中依赖 sp1_zkv_sdk,下面这些小节展示了如何手动完成所需转换。
首先需要在 script 目录下的 Cargo.toml 的 [dependencies] 中加入:
bincode = { version = "2", features = ["serde"] }
然后导入必要模块,并定义一个结构来保存 proof。请在 imports 后加入以下代码:
use sp1_sdk::HashableKey; // for the `hash_babybear` method.use std::{fs::File, io::Write};use serde::{Deserialize, Serialize};// Struct of the output we need#[derive(Serialize, Deserialize)]struct Output{image_id: String,pub_inputs: String,proof: String}// Helper function to get hex stringsfn to_hex_with_prefix(bytes: &[u8]) -> String {let hex_string: String = bytes.iter().map(|b| format!("{:02x}", b)).collect();format!("0x{}", hex_string)}
Proof
SP1 verification pallet 支持 shrunk STARK proof。下面这段代码可以从 Proof generation 小节得到的 proof 中生成所需数据。请把它放在 SP1 prover SDK 生成 proof 之后:
// Extract the inner compressed proof.let compressed_proof = proof.proof.try_as_compressed().expect("proof is not compressed");// Shrink the compressed proof.let SP1ReduceProof {vk,proof: shard_proof,} = client.inner().shrink(*compressed_proof, Default::default()).expect("failed to shrink");let input = SP1CompressWitnessValues {vks_and_proofs: vec![(vk.clone(), shard_proof.clone())],is_complete: true,};let proof_with_vk_and_merkle = self.inner().make_merkle_proofs(input);let zkv_proof = Proof {shard_proof,vk,vk_merkle_proof: proof_with_vk_and_merkle.merkle_val.vk_merkle_proofs[0].clone(),}// Serialize the shrunk_prooflet serialized_proof = bincode::serde::encode_to_vec(&zkv_proof, bincode::config::legacy()).expect("failed to serialize proof");
Verification Key
SP1 verification pallet 接收通过 hash_babybear 方法哈希、并以 little endian bytes 序列化的 verification key。示例如下:
// `vk` is the verification key obtained from `ProverClient::setup` method.let vk_hash: [u8; 32] = vk.hash_bytes();
Public Values
SP1 verification pallet 接收以 bytes 向量表示的 public inputs,可以直接从最初的 SP1ProofWithPublicValues proof 中提取:
let public_values = proof.public_values.to_vec();
Storing the output
当所有 proof artifacts 都生成后,我们会把它们写入一个 json 文件,供后续验证使用。请加入以下代码,把这些 artifacts 保存为所需结构:
let output = Output{proof: to_hex_with_prefix(&serialized_proof),image_id: to_hex_with_prefix(&vk_hash),pub_inputs: to_hex_with_prefix(&public_values),};let json_string = serde_json::to_string_pretty(&output).expect("Failed to serialize to JSON.");let mut file = File::create("proof.json").unwrap();file.write_all(json_string.as_bytes()).unwrap();
参考 ezkl 教程生成证明,使用生成的 proof、vk、public inputs,通过 zkVerifyJS 或 PolkadotJS 按 ezkl 选项提交,并选择对应 Domain ID。
我们将使用 zkonduit 的 quickstart guide 生成 EZKL proof,然后在 zkVerify 上完成验证。这里不会展开讲 EZKL 的内部实现,重点放在如何高效地在 zkVerify 上验证这些 proof。
步骤
- 安装 EZKL 及其依赖
- 定义模型并导出为 ONNX 格式
- 生成 EZKL proof
- 使用 Bash 将 proof、vk 和 instances(public inputs)转换为所需 hex 格式
- 在 zkVerify 上验证 proof 并获得 proof receipt
- 在以太坊上验证 proof receipt
开始本教程前,首先需要安装 EZKL zkML 库。本教程主要使用 Bash CLI;但在定义示例模型时,会借助 Python3 和 PyTorch。只要你能把模型导出为 .onnx 格式,其他框架也同样可行。更多替代方案可参考 zkonduit 提供的 EZKL documentation 和 ONNX documentation。建议使用虚拟环境。请执行以下命令安装依赖:
- 运行以下命令安装
ezkl:
curl https://raw.githubusercontent.com/zkonduit/ezkl/main/install_ezkl_cli.sh | bash
- 安装 ONNX:
pip install onnx
- 安装 PyTorch:
pip install torch torchvision
- 定义模型,导出到
network.onnx,并创建input.json文件:
重要: 如果你已经准备好了导出的模型(network.onnx)和输入文件(input.json),可以完全跳过这一步。
为了说明流程,我们创建一个 Python 脚本,定义一个学习线性函数 的简单模型。文件名就叫 export_model.py。
import torchimport torch.nn as nnimport jsonimport os# 1. DEFINE THE PYTORCH MODELclass SimpleModel(nn.Module):def __init__(self):super(SimpleModel, self).__init__()self.linear = nn.Linear(1, 1)# Manually set weights to learn y = 2x + 1self.linear.weight.data.fill_(2.0)self.linear.bias.data.fill_(1.0)def forward(self, x):return self.linear(x)# 2. EXPORT TO ONNXmodel = SimpleModel()model.eval()# Define a dummy input for the ONNX exportdummy_input = torch.randn(1, 1)onnx_path = "network.onnx"torch.onnx.export(model, dummy_input, onnx_path, export_params=True, input_names=['input'], output_names=['output'])print(f"Model exported to {onnx_path}")# 3. CREATE THE INPUT DATA FILE# Let's test with an input of x = 2. We expect the output to be 2*2 + 1 = 5input_data = dict(input_data = [[2.0]])json_path = "input.json"with open(json_path, 'w') as f:json.dump(input_data, f)print(f"Input data saved to {json_path}")
先在 Bash 中运行 chmod +x export_model.py 给脚本执行权限,然后执行 python3 export_model.py。脚本完成后,你应该会得到两个文件:network.onnx 和 input.json。这时就可以开始使用 ezkl 了。
- 生成 Settings:
首先需要让
ezkl为模型生成初始电路参数。要检查模型并创建这份配置文件,请运行:
ezkl gen-settings -M network.onnx -O settings.json
这一步会生成 settings.json。
- 校准 Settings(可选):
这一步 可选,但很关键,因为它会运行一次模拟前向传播,以确定模型中数值最合适的 fixed-point scaling。实质上,它会微调 settings.json 的参数,使之更贴近你的真实模型和数据,从而降低 proof 因算术误差失败的概率。你需要为 calibrate-settings 命令提供一个 calibration.json 数据文件。该文件的数据形状和结构必须与 input.json 保持一致,只是具体数值不同,并且这些数值应具有代表性,而不是随便填的 dummy 数据。ezkl 会利用这份数据自动调优电路设置(例如 scales、constraints 和 logrows)。为了简化教程,我们直接使用 input.json 作为校准数据文件。执行以下命令开始校准:
ezkl calibrate-settings -D input.json -M network.onnx --settings-path settings.json
这一步会用优化后的参数更新 settings.json。
- 编译模型:
这一步会把神经网络转换成 arithmetic circuit,这是生成 proof 的基础对象。请运行:
ezkl compile-circuit -M network.onnx --settings-path settings.json --compiled-circuit model.compiled
这一步会生成 model.compiled 文件,其中包含适用于零知识证明的模型优化格式。
- 下载对应的 SRS 文件:
你需要根据所使用的 commitment scheme(默认是 KZG)以及 logrows 的数量下载相应的 Structured Reference String(SRS)文件。这些信息都写在 circuit settings 文件中。执行以下命令开始下载:
ezkl get-srs -S settings.json
默认情况下,下载的 SRS 会保存在 ~/.ezkl/srs。
- 执行 Trusted Setup,生成加密密钥:
执行以下命令:
ezkl setup -M model.compiled --pk-path pk.key --vk-path vk.key
此时你应该已经得到 pk.key(prover 使用的 proving key)和 vk.key(verifier 使用的 verification key)。
- 生成 witness:
这一步会根据你的输入数据和编译后的模型生成 witness 文件。直接运行:
ezkl gen-witness -M model.compiled -D input.json -V vk.key -O witness.json
这一步会生成 witness.json 文件。
- 生成 proof:
要利用 witness 和其他 artifacts 生成零知识 proof,请运行:
ezkl prove -M model.compiled --pk-path pk.key --proof-path proof.json -W witness.json
执行后你会得到一个名为 proof.json 的 JSON 文件,其中同时包含 proof 和 instances(public inputs)。
- 生成 VKA:
Reusable EZKL verifier 依赖一个额外 artifact,叫做 Verification Key Artifact(简称 VKA)。生成方法如下:
ezkl create-evm-vka -S settings.json --vk-path vk.key --vka-path vka.bytes
执行后你会额外得到一个 vka.bytes 文件。
到这里基本就准备好了。proof.json 和 vka.bytes 这两个 artifact 已经包含了 zkVerify 验证该 proof 所需的全部信息。最后一步是把其中的数据提取出来,并转换成可直接供 zkVerify 使用的格式。
为此,请执行以下 Bash 命令:
# Convert vka to hexadecimal formattail -c +9 vka.bytes | xxd -p | tr -d '\n' | sed 's/.*/`{"vkBytes": "0x&"}`/' > zkv_vk.hex# Convert proof to hexadecimal formatjq -r '.proof[] | select(type == "number")' proof.json | awk 'BEGIN {printf "\"0x"} {printf "%02x", $1} END {printf "\"\n"}' > zkv_proof.hex# Convert instances (public inputs) to hexadecimal formatecho "[$(jq -r '.pretty_public_inputs.outputs | flatten | map("\"\(.)\"") | join(", ")' proof.json)]" > zkv_pubs.hex
生成 proof 后,你可以通过多种方式在 zkVerify 上完成验证。推荐的方式是使用 Kurier。你也可以任选以下方式之一进行验证:
- 使用 Kurier
- 使用 zkVerifyJS package
- 使用 Polkadot.js frontend
- 使用 subxt Rust crate